> ## Documentation Index
> Fetch the complete documentation index at: https://docs.fiducia.gg/llms.txt
> Use this file to discover all available pages before exploring further.
# Workflow System
The workflow automation system follows the same trigger and action setup as our template automations. This lets you build fully custom flows, so you can target members more precisely, capture more leads, and automate key parts of growing and managing your Skool community.
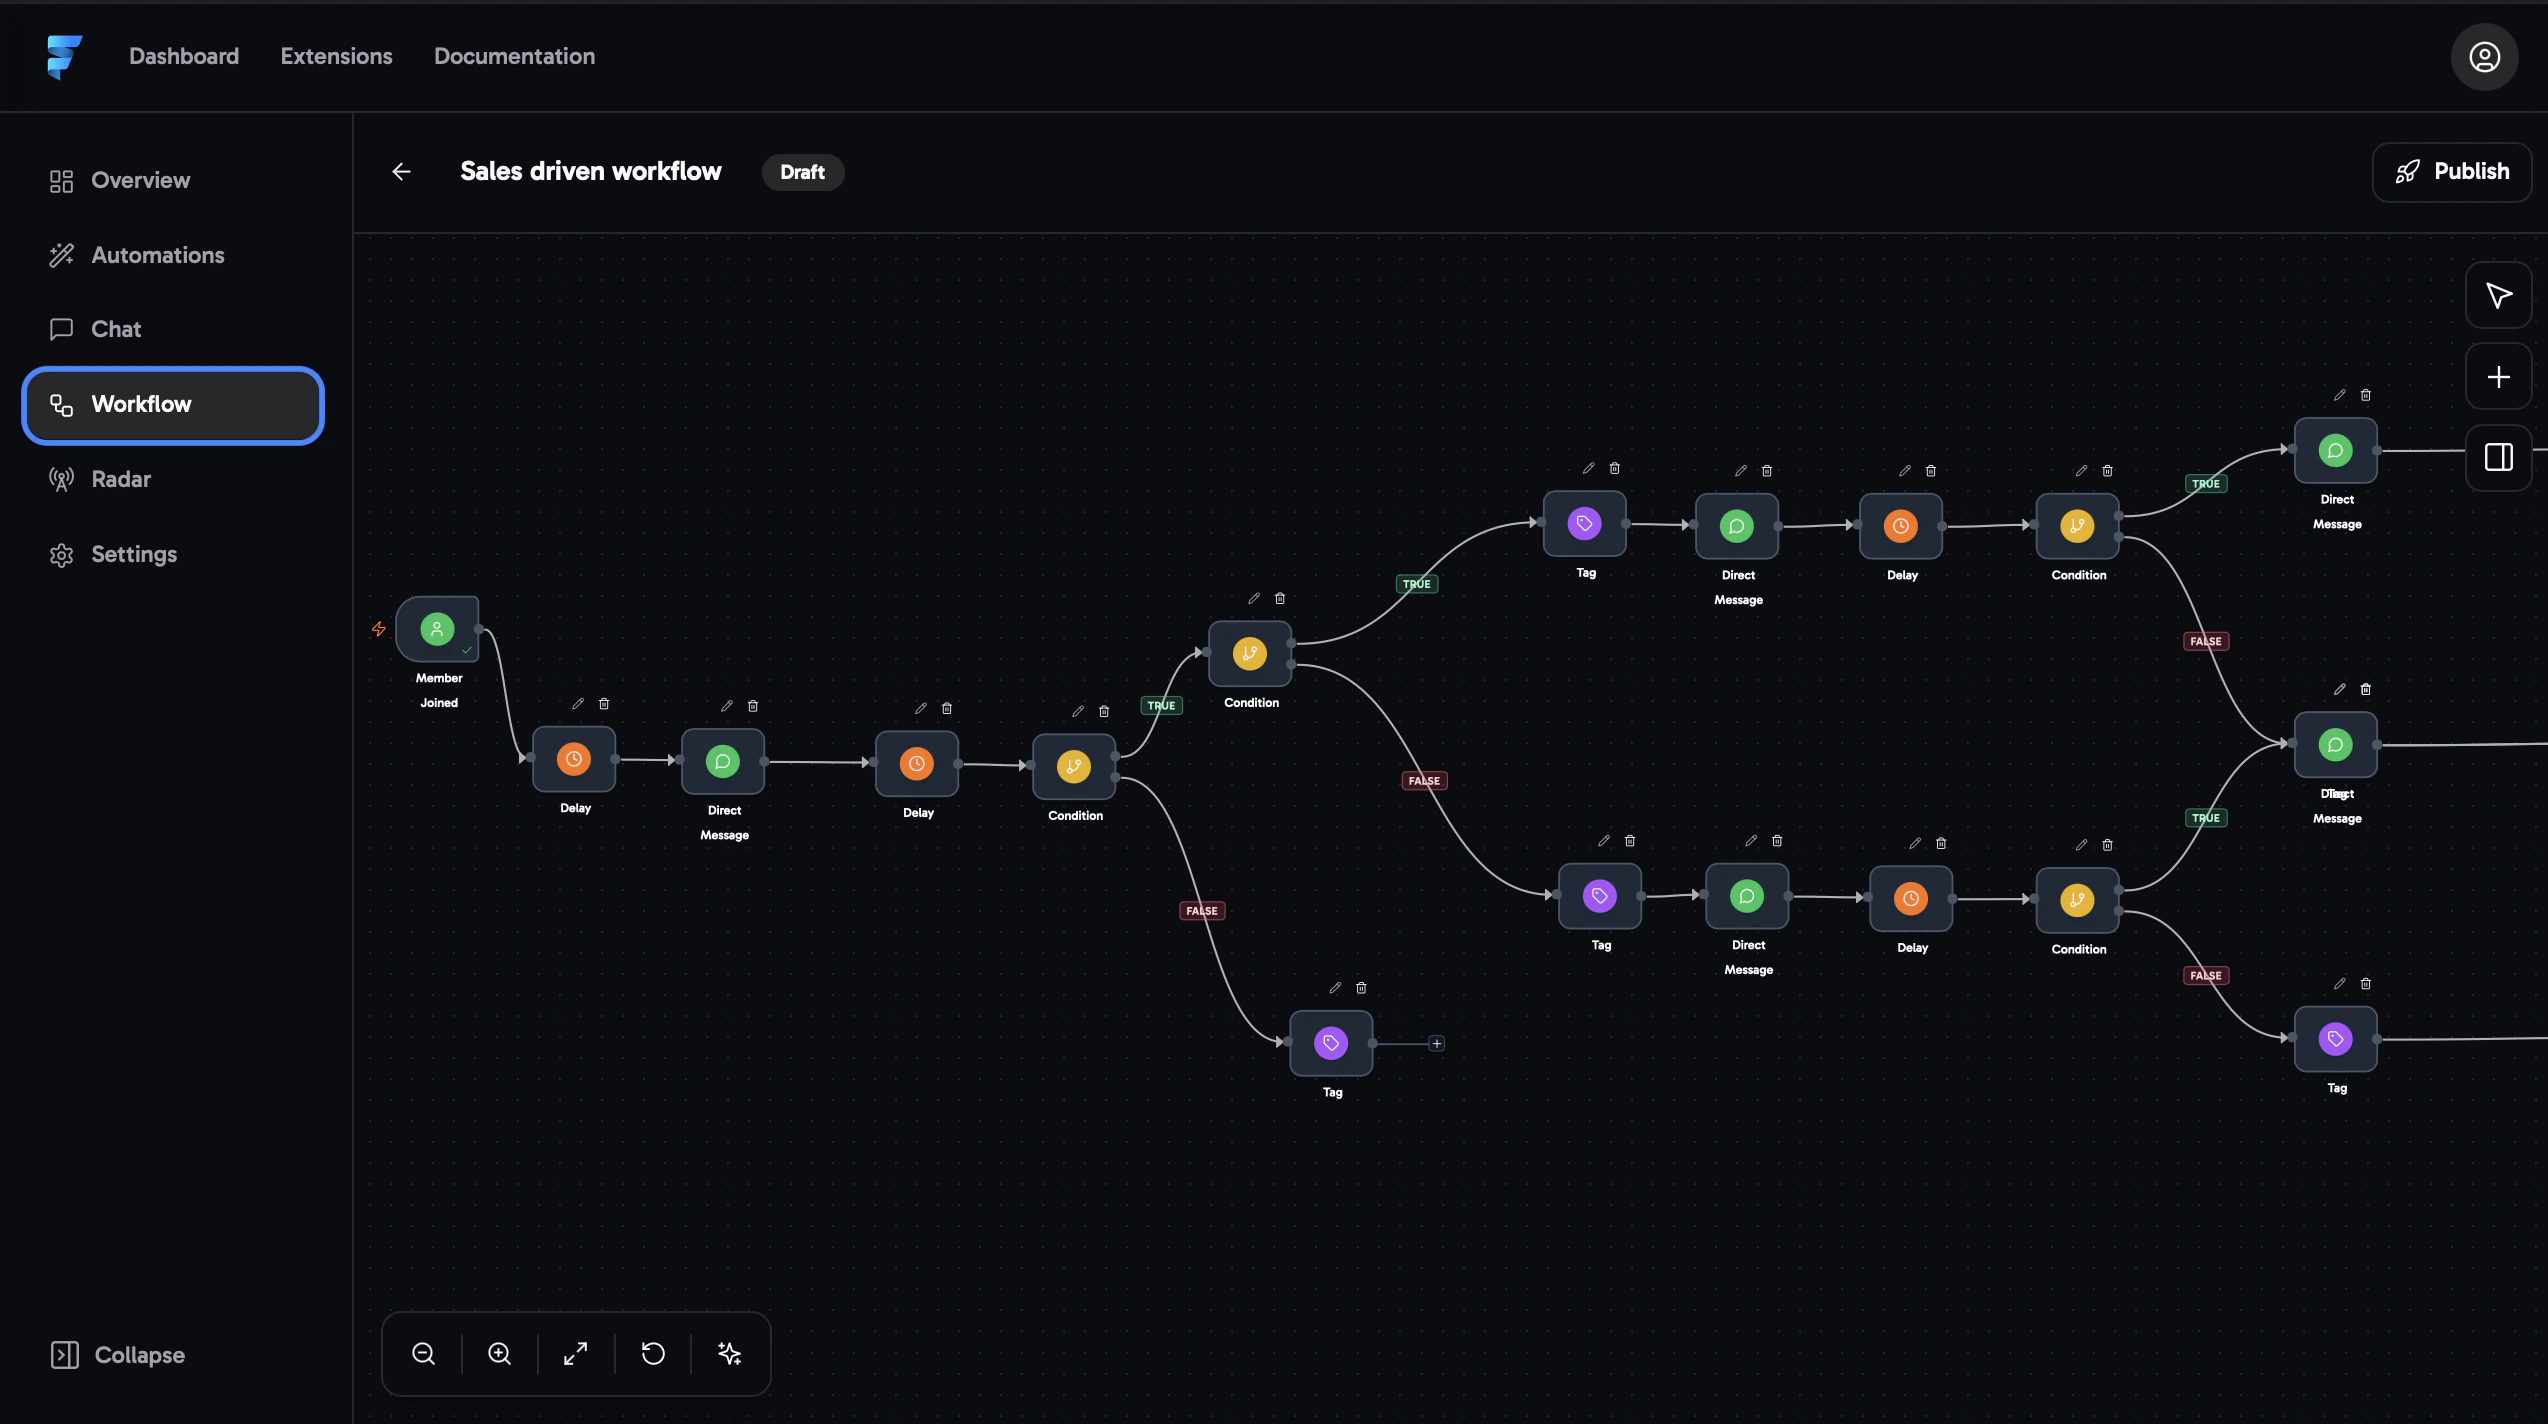 If you **cannot access the workflow system** on the left side of your
Fiducia instance, your current plan includes feature limitations. You can
upgrade at any time by reaching out to
[**support@fiducia.gg**](mailto:support@fiducia.gg) or book a
[**personalised demo
call**](https://calendly.com/juliusortenburg/fiducia-consultation).
## Creating Workflows
Below, you'll find a beginner's guide on how to set up your first workflow.
If you **cannot access the workflow system** on the left side of your
Fiducia instance, your current plan includes feature limitations. You can
upgrade at any time by reaching out to
[**support@fiducia.gg**](mailto:support@fiducia.gg) or book a
[**personalised demo
call**](https://calendly.com/juliusortenburg/fiducia-consultation).
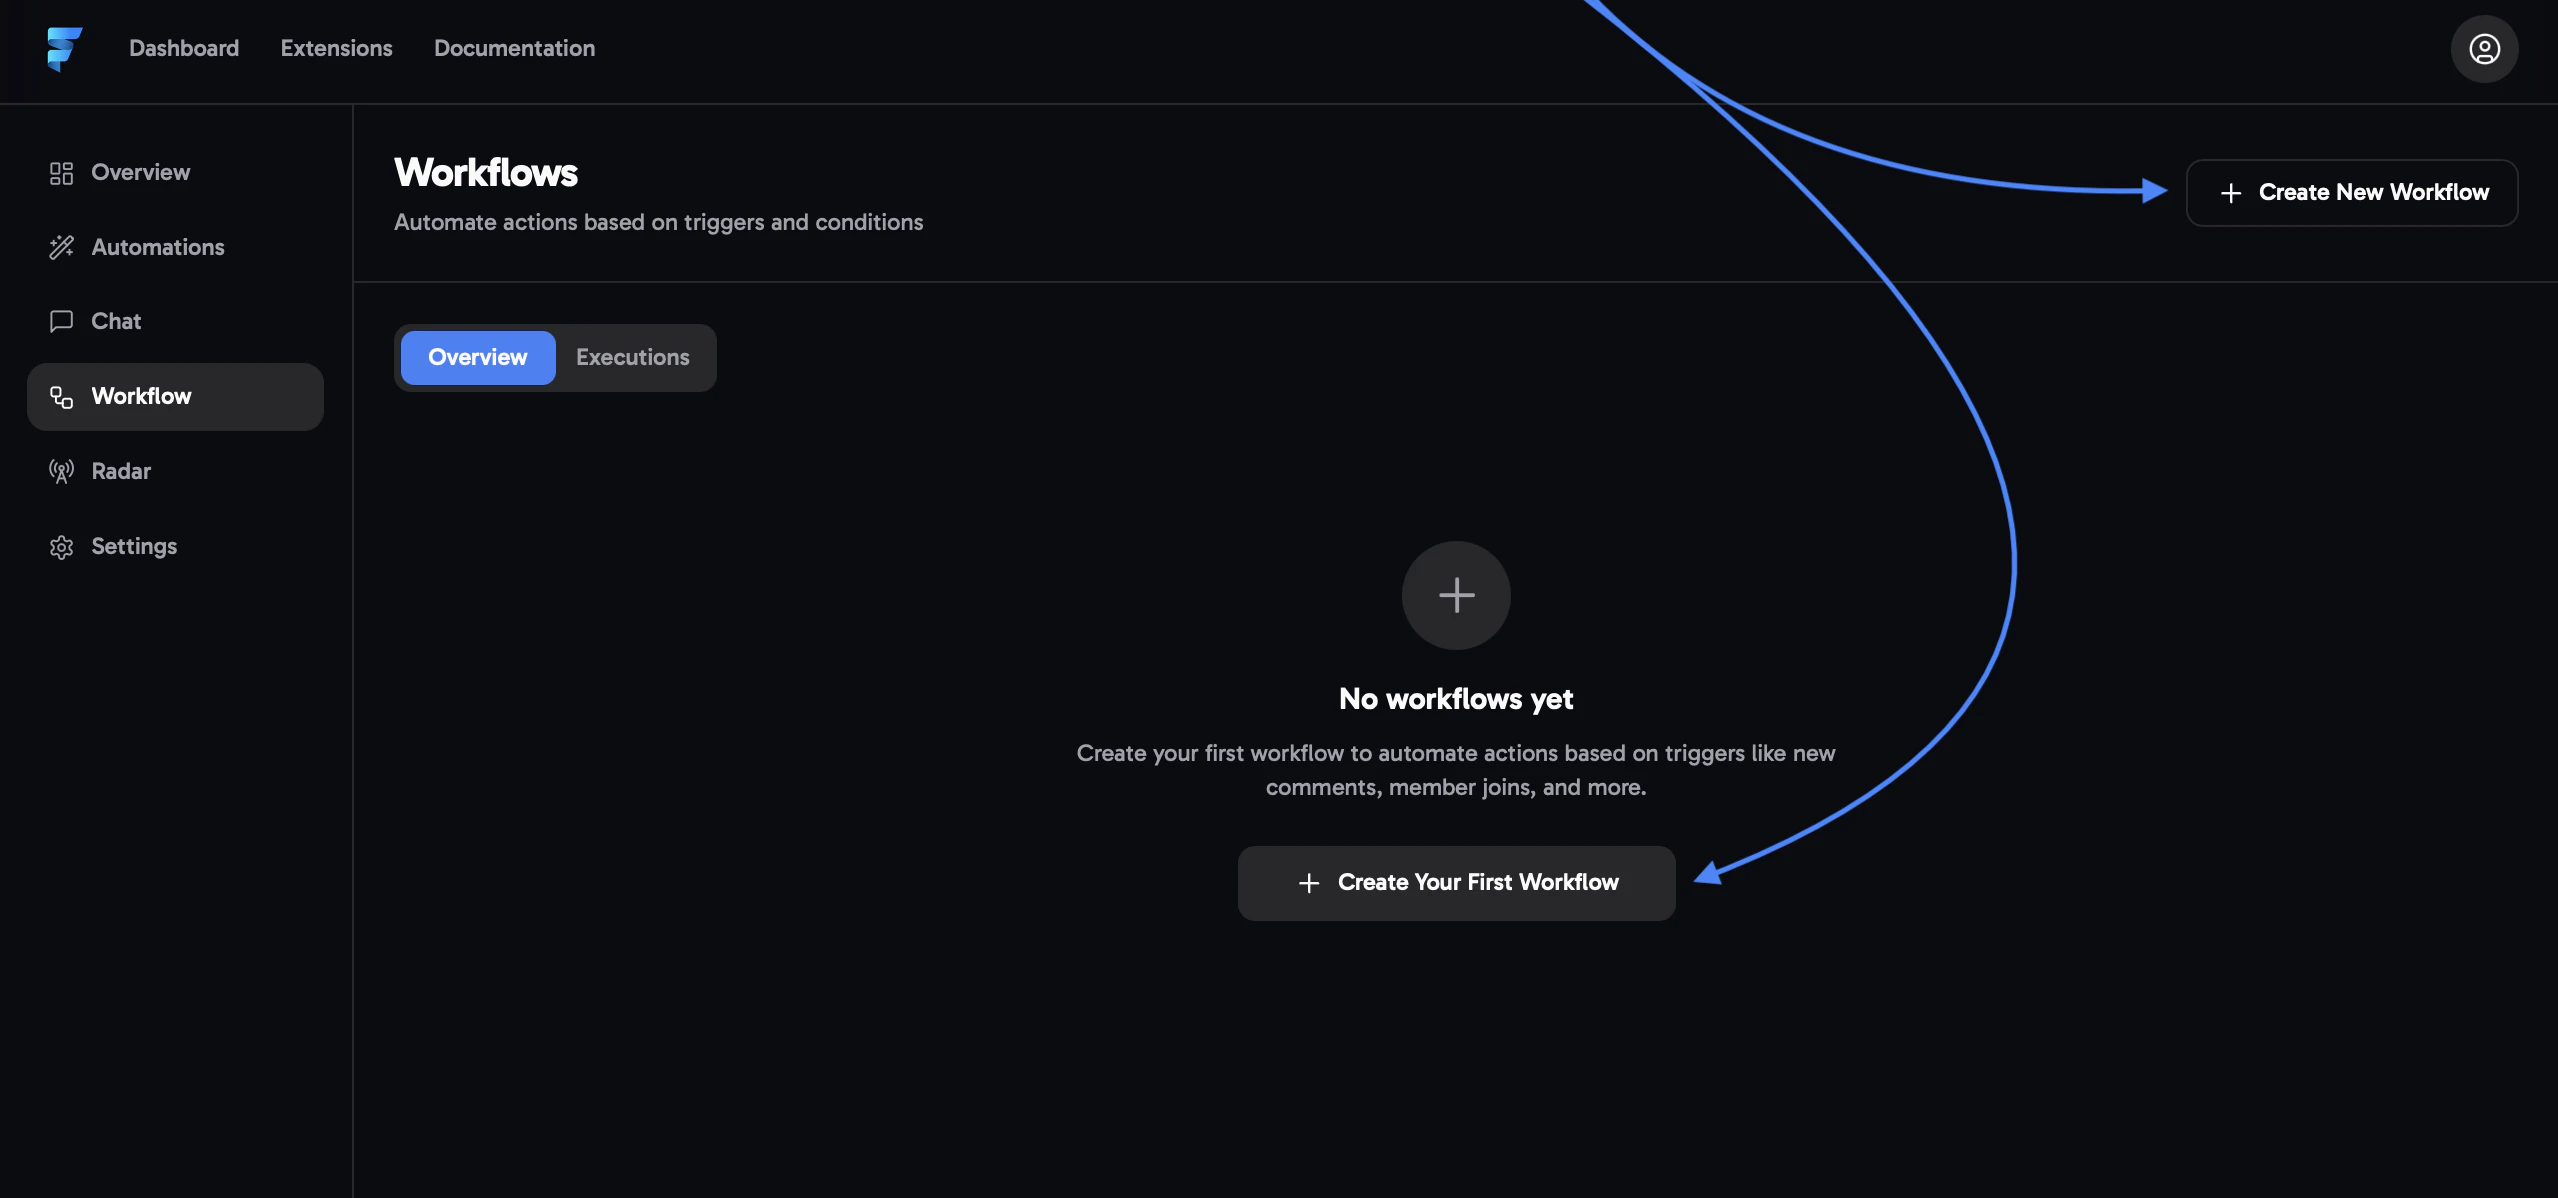
## Creating Workflows
Below, you'll find a beginner's guide on how to set up your first workflow.
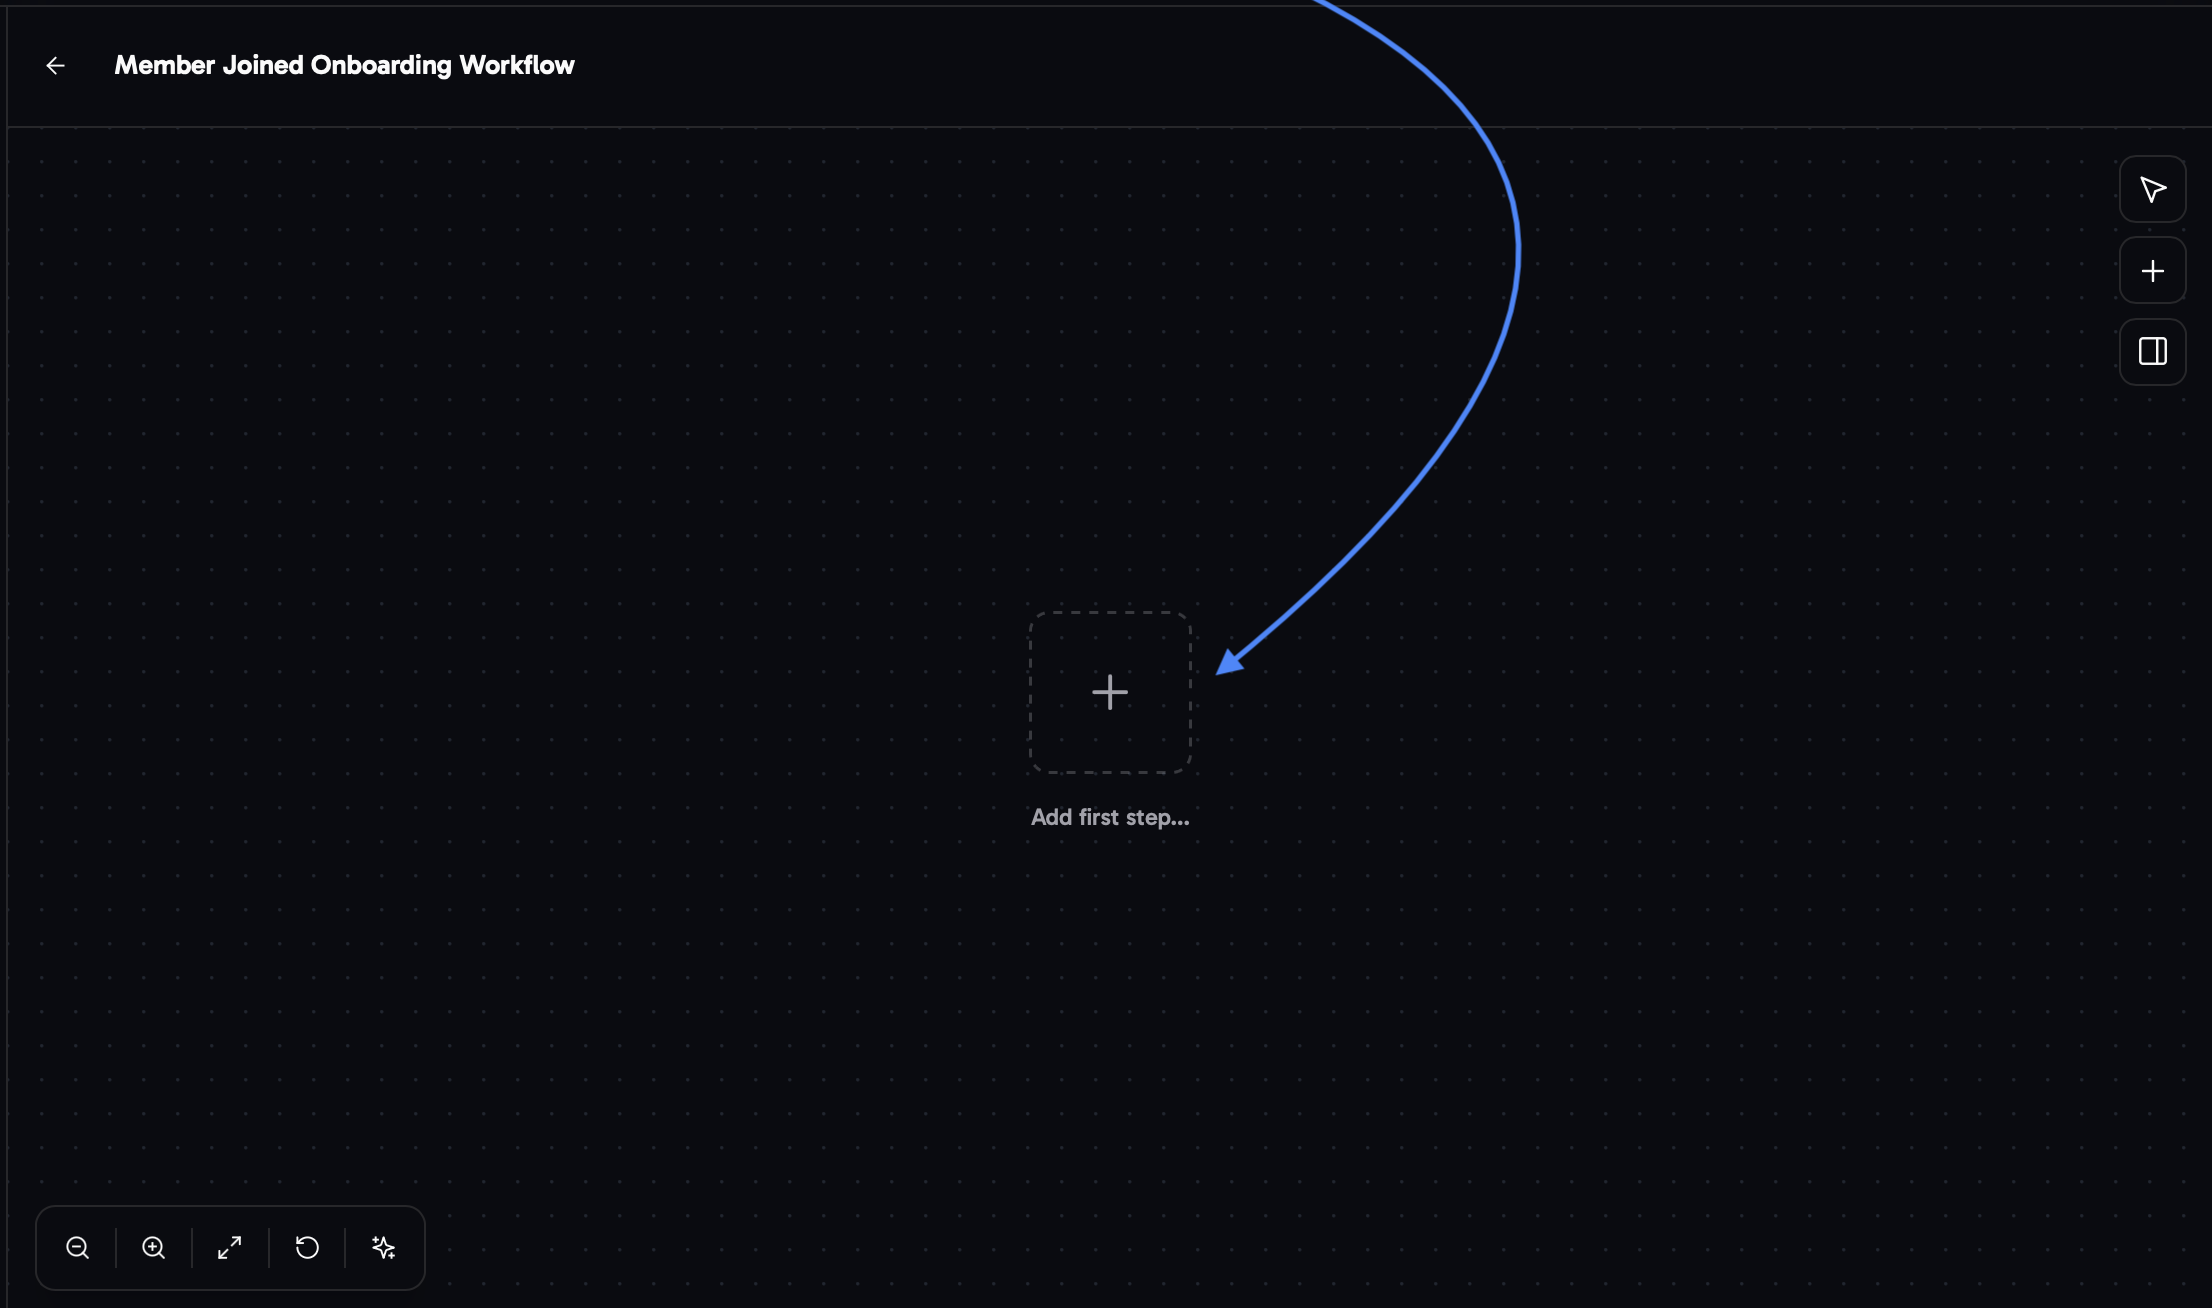
 If you have team members or multiple people working inside the same Fiducia account, adding a short description of what the workflow does can be very helpful.
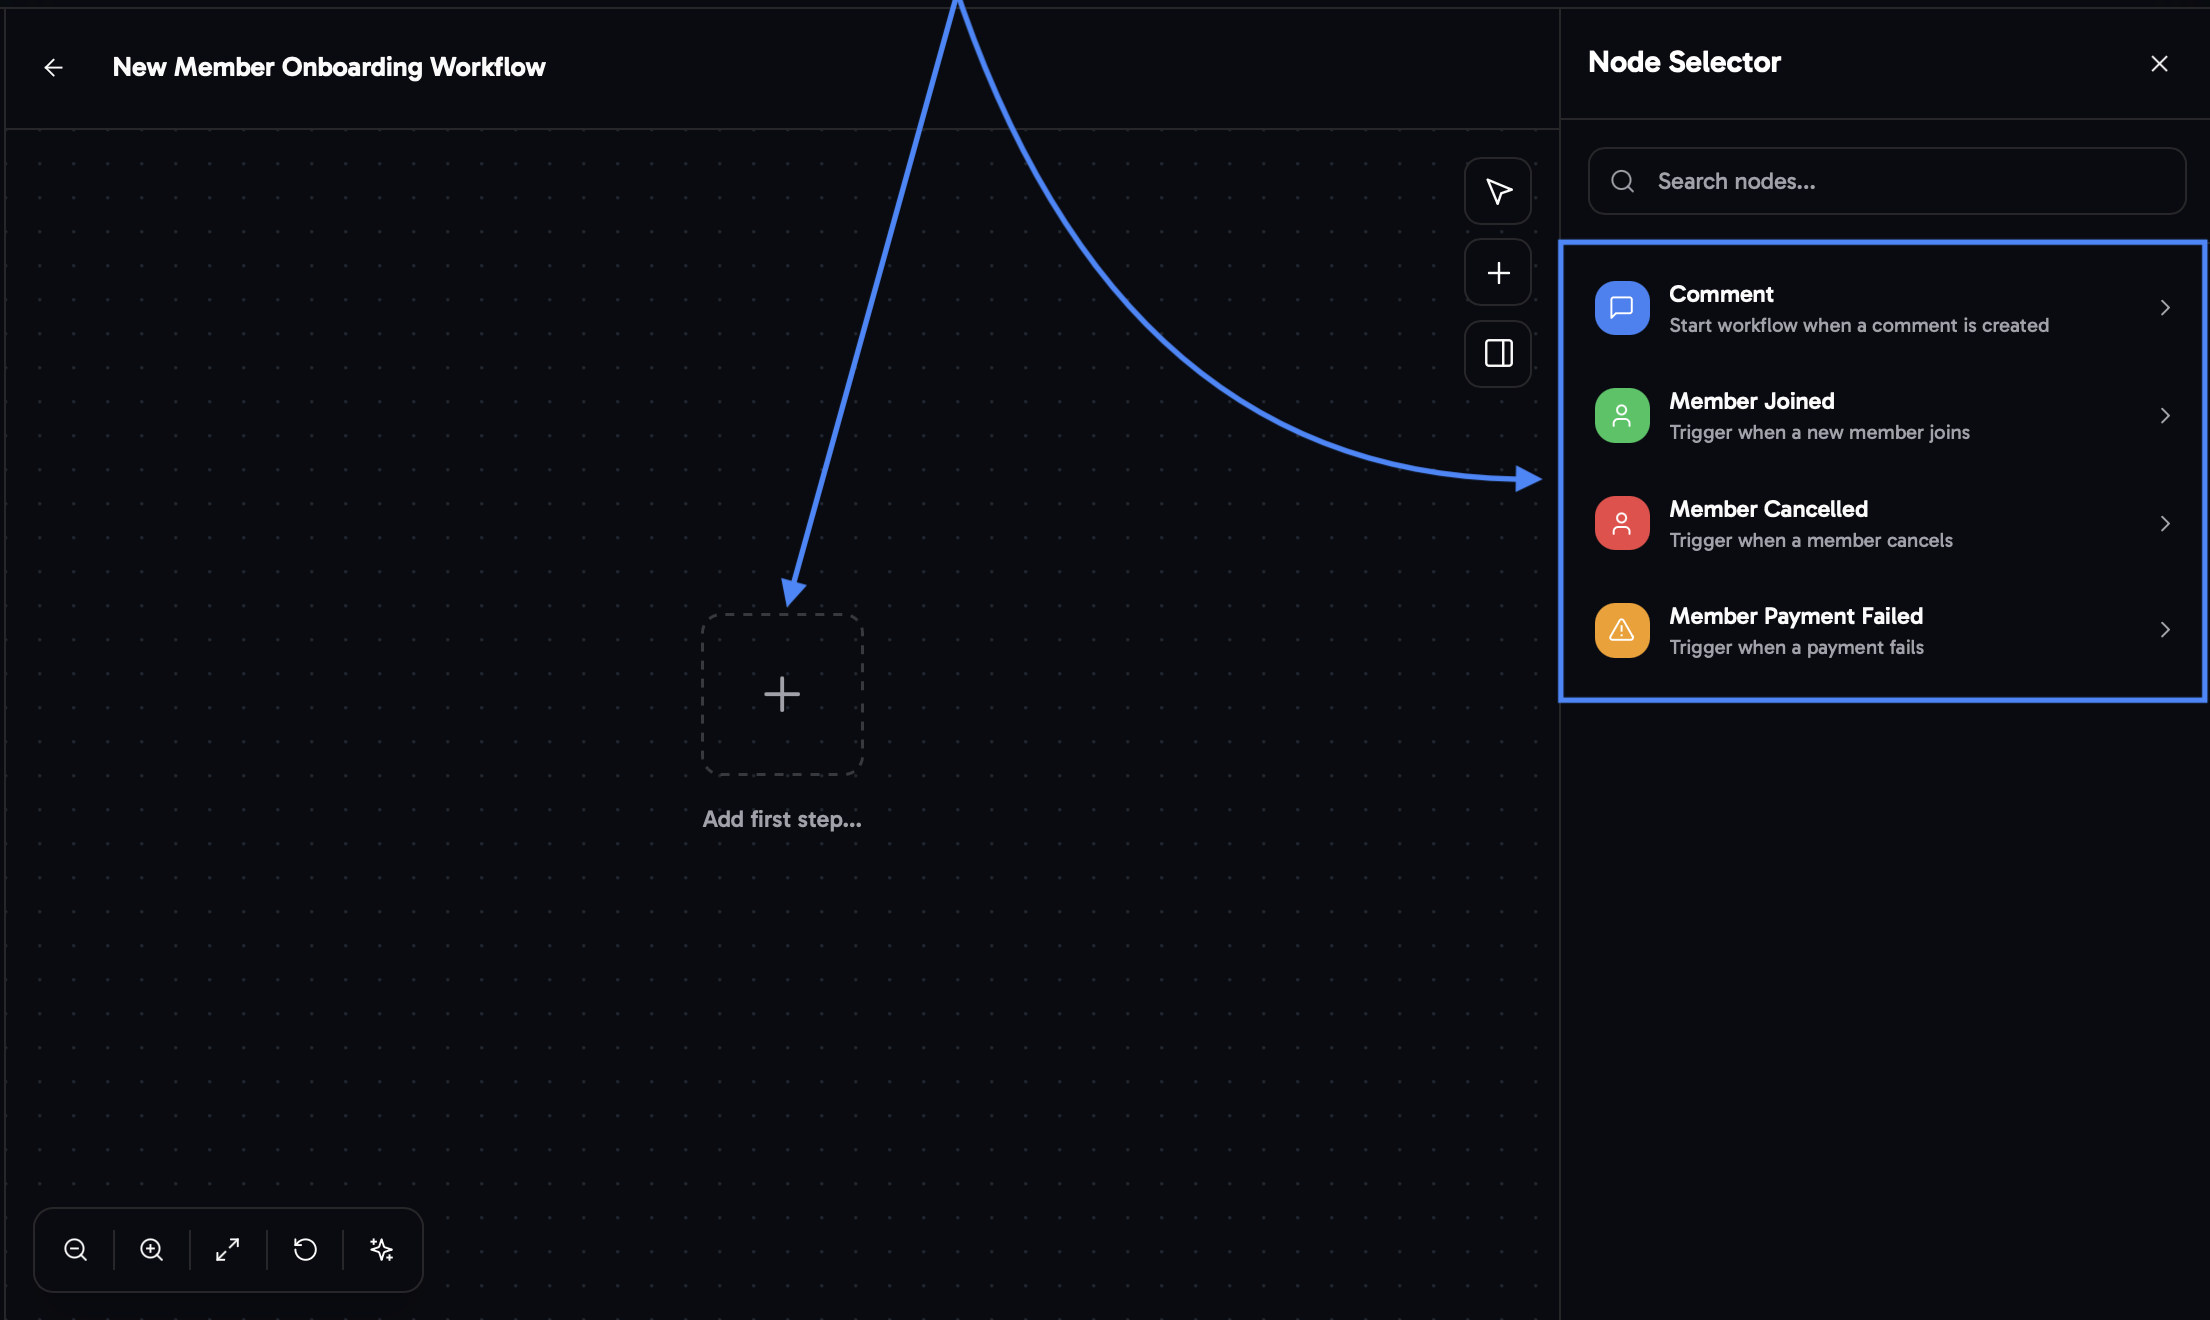 ### Here are the different options and their main use cases and benefits:
Automatically triggers when a member comments a keyword under a post.
Great for collecting new leads, increasing show-up rates, and promoting special offers.
Automatically triggers the moment a new member joins your community.
Great for onboarding, timed pitch messages, and improving overall customer support & experience.
Automatically triggers once a member cancels your paid community.
Great for bringing members back and collecting feedback on why they left and how you can improve.
Automatically triggers once a payment fails or a member's card is declined.
Great for re-engaging members, reminding them of payment issues, and helping them resolve it quickly.
## Select from Six Different Nodes and Learn How to Set Up Each One
> If you want to directly learn how to set up complete workflows, head to the [Basic Templates](#basic-templates-and-structure-of-each-automation-type) section below.
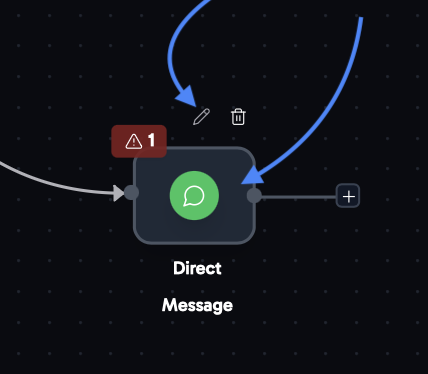
Direct messages are the central node of a strong workflow. They help you check in with members, pitch offers, start meaningful conversations, and more.
### Here are the different options and their main use cases and benefits:
Automatically triggers when a member comments a keyword under a post.
Great for collecting new leads, increasing show-up rates, and promoting special offers.
Automatically triggers the moment a new member joins your community.
Great for onboarding, timed pitch messages, and improving overall customer support & experience.
Automatically triggers once a member cancels your paid community.
Great for bringing members back and collecting feedback on why they left and how you can improve.
Automatically triggers once a payment fails or a member's card is declined.
Great for re-engaging members, reminding them of payment issues, and helping them resolve it quickly.
## Select from Six Different Nodes and Learn How to Set Up Each One
> If you want to directly learn how to set up complete workflows, head to the [Basic Templates](#basic-templates-and-structure-of-each-automation-type) section below.
Direct messages are the central node of a strong workflow. They help you check in with members, pitch offers, start meaningful conversations, and more.
 Use the placeholders below to personalize your direct message and make it more effective.
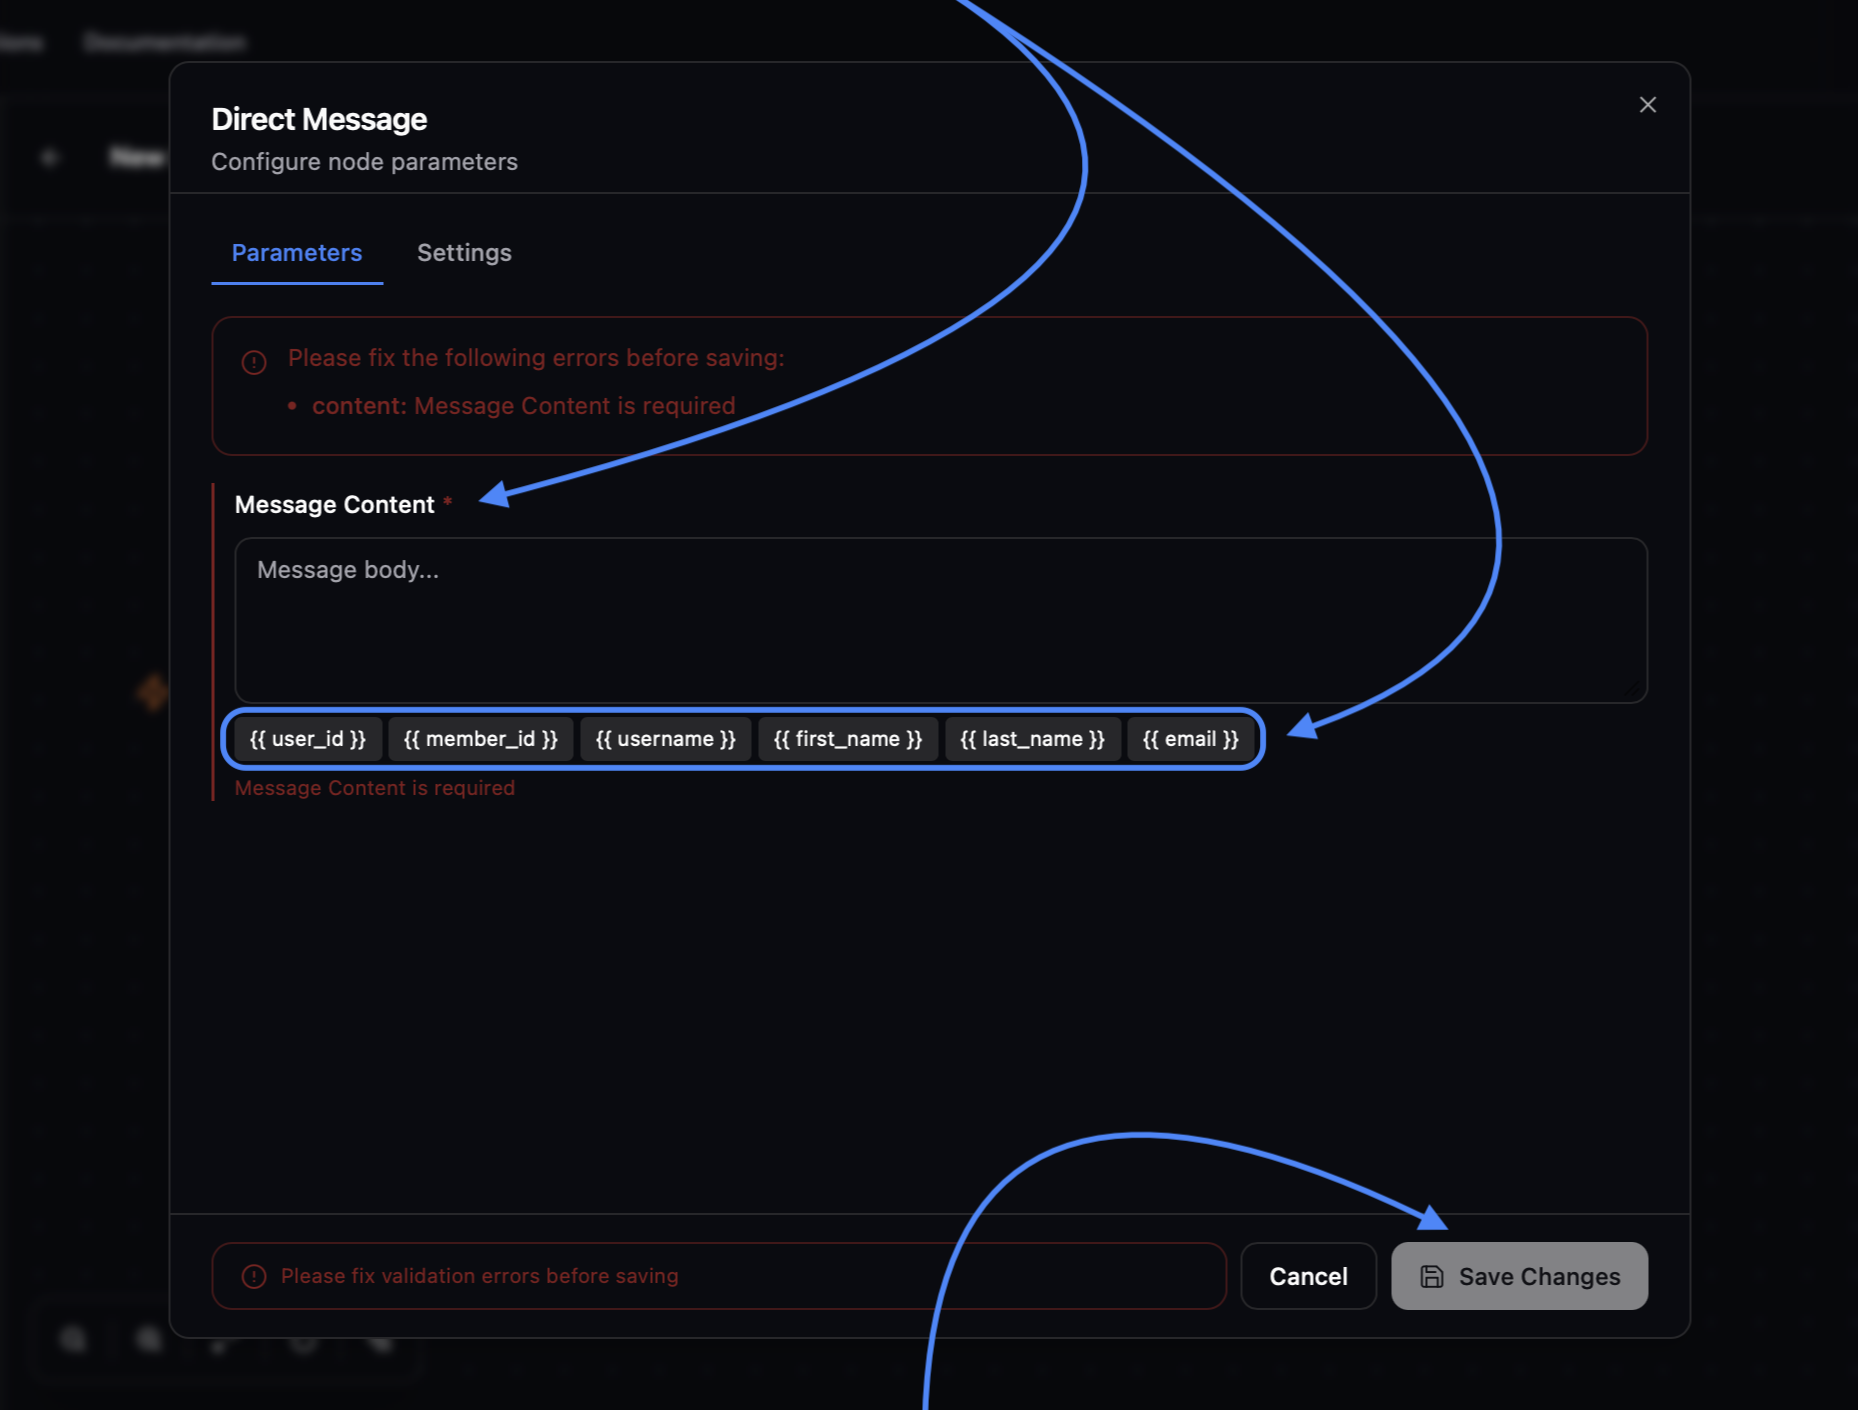 Once you're happy with your message, click **'Save Changes'** to continue the flow.
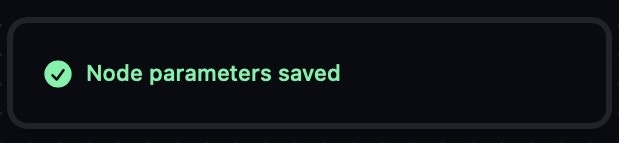
After clicking **"Save changes"**, this pop-up should appear in the bottom right corner. ✅
Once you're happy with your message, click **'Save Changes'** to continue the flow.
After clicking **"Save changes"**, this pop-up should appear in the bottom right corner. ✅
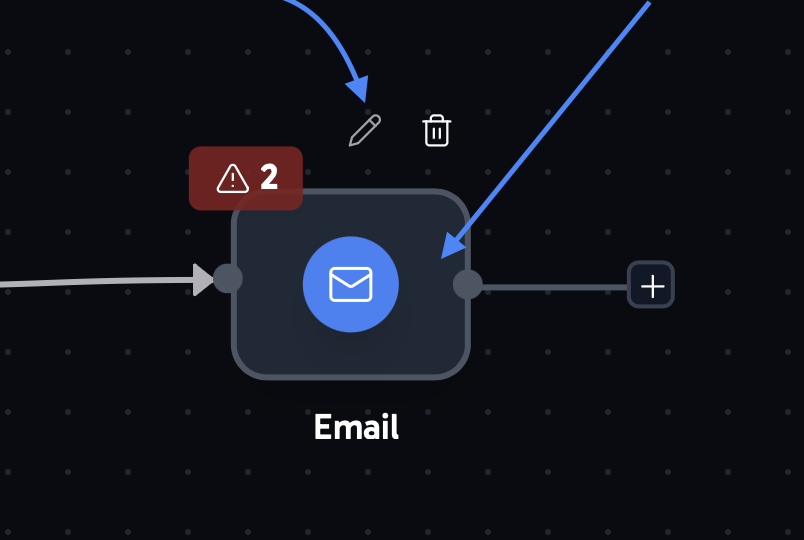
 Email messages are a great addition to any workflow. They allow
you to notify team members, reach out to members who become
inactive on Skool, capture attention across multiple platforms,
and much more.
Email messages are a great addition to any workflow. They allow
you to notify team members, reach out to members who become
inactive on Skool, capture attention across multiple platforms,
and much more.
 Use the placeholders to personalize your email and make it more
effective.
Use the placeholders to personalize your email and make it more
effective.
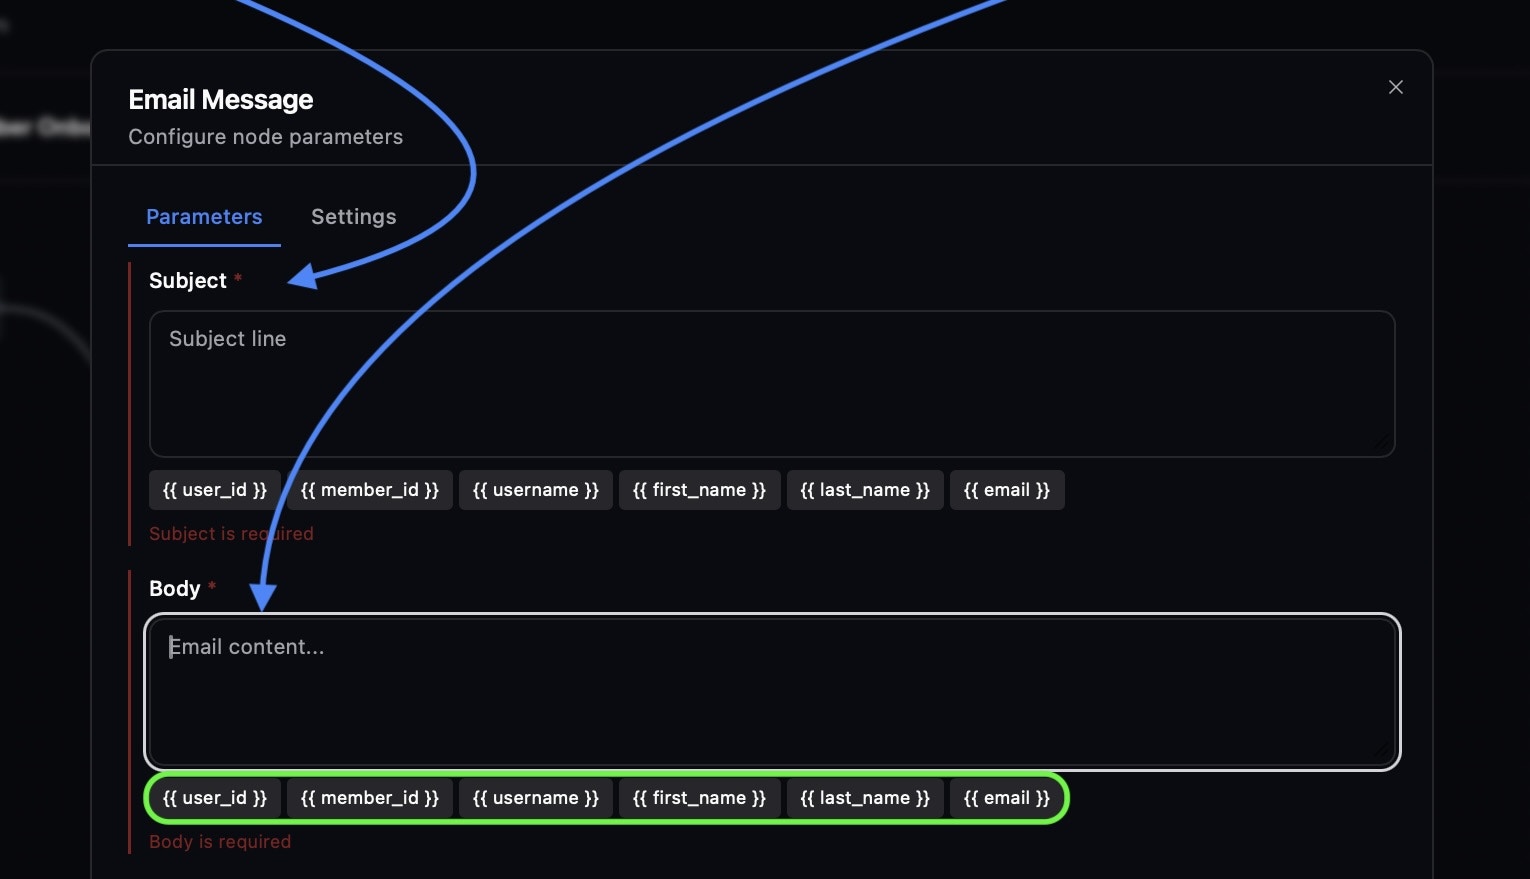 Once you're happy with your setup, click **'Save Changes'** to
continue the flow.
After clicking **"Save changes"**, this pop-up should appear in
the bottom right corner. ✅
Delays are a **key part of clean workflow logic**. After sending
a DM or email, adding a delay before the next step ensures
better timing, keeps communication natural, avoids back-to-back
messages, improves member experience, and increases response
rates.
Once you're happy with your setup, click **'Save Changes'** to
continue the flow.
After clicking **"Save changes"**, this pop-up should appear in
the bottom right corner. ✅
Delays are a **key part of clean workflow logic**. After sending
a DM or email, adding a delay before the next step ensures
better timing, keeps communication natural, avoids back-to-back
messages, improves member experience, and increases response
rates.
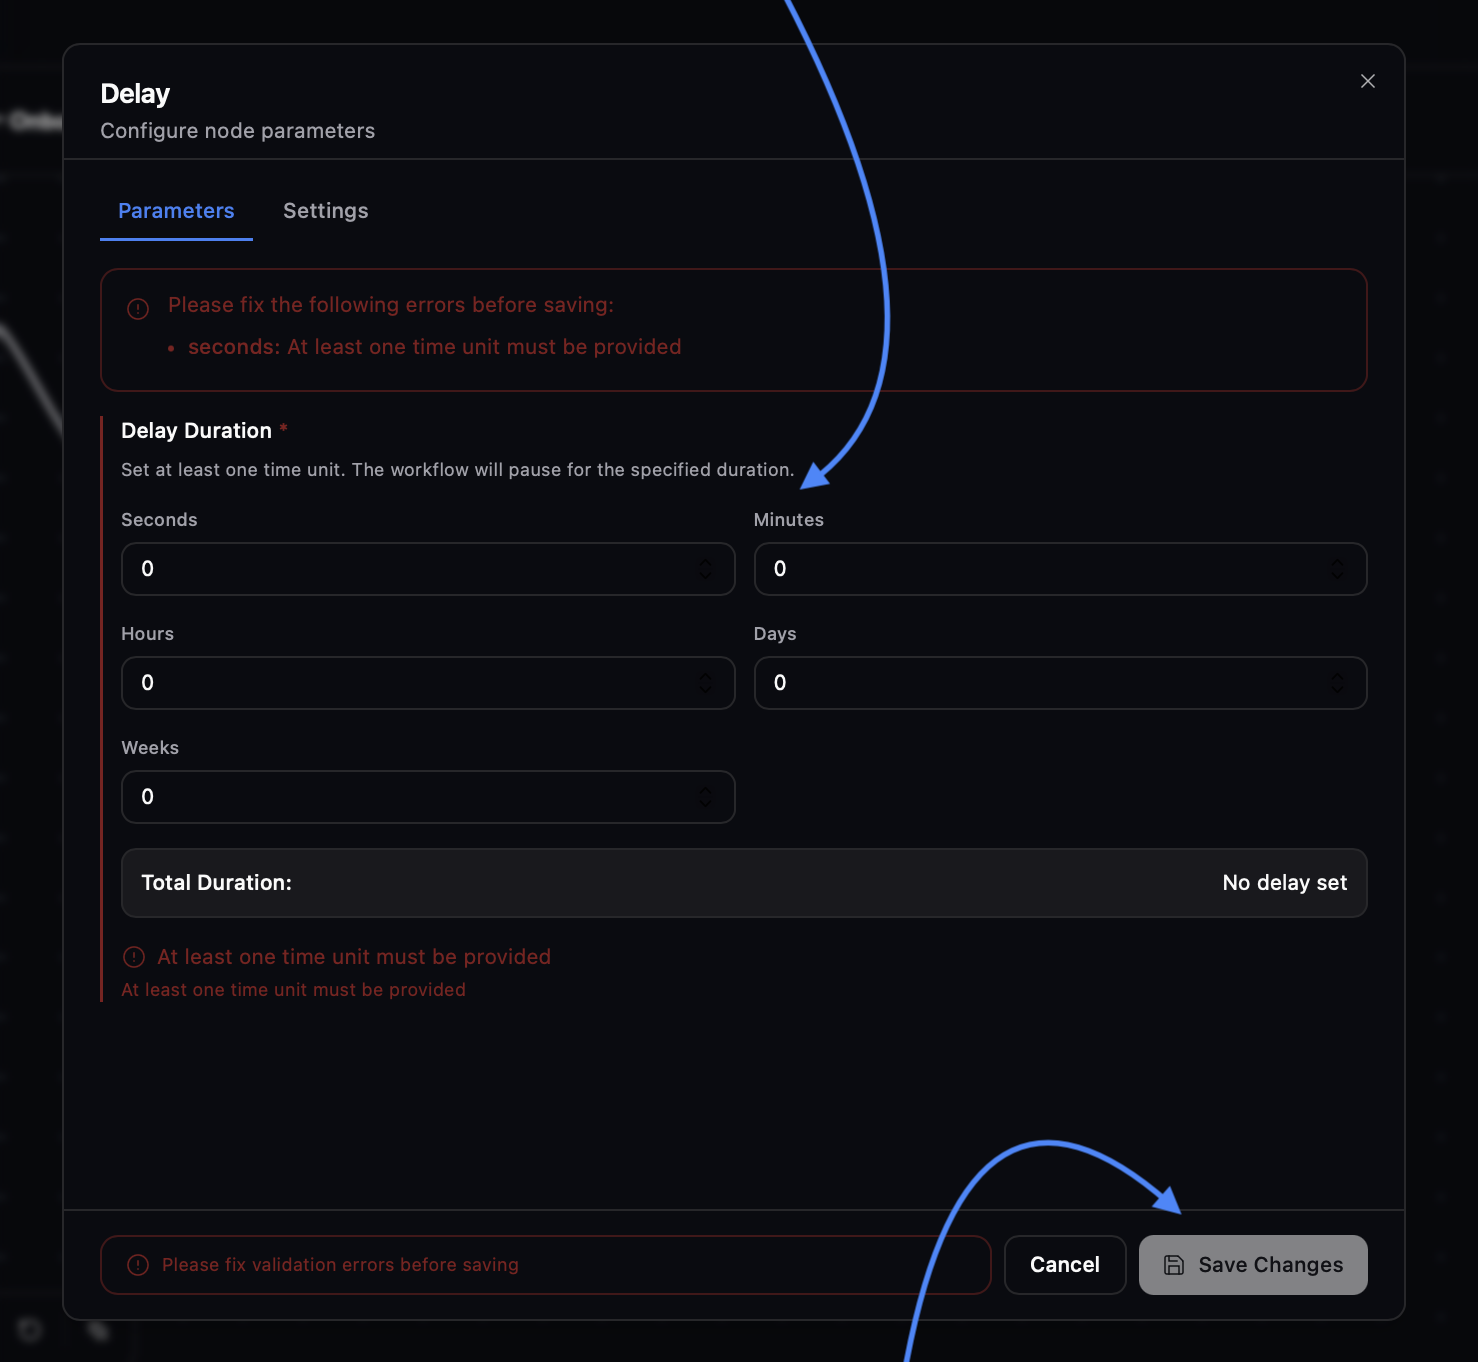 Once you're happy with your setup, click **'Save Changes'** to
continue the flow.
After clicking **"Save changes"**, this pop-up should appear in
the bottom right corner. ✅
This node lets you **track message status, monitor folders and
tags, check replies, detect keywords under posts, and more**. It
helps you target specific groups more accurately and improve the
overall customer experience, driving more sales.
The "Advanced" section in the top right gives you additional
flexibility for building workflows, but it is more complex and
best suited for users with technical experience.
Adding both paths helps you track progress, organise leads,
personalize messages and automations based on behaviour, and
improve data tracking through webhooks.
Once you're happy with your setup, click **'Save Changes'** to
continue the flow.
After clicking **"Save changes"**, this pop-up should appear in
the bottom right corner. ✅
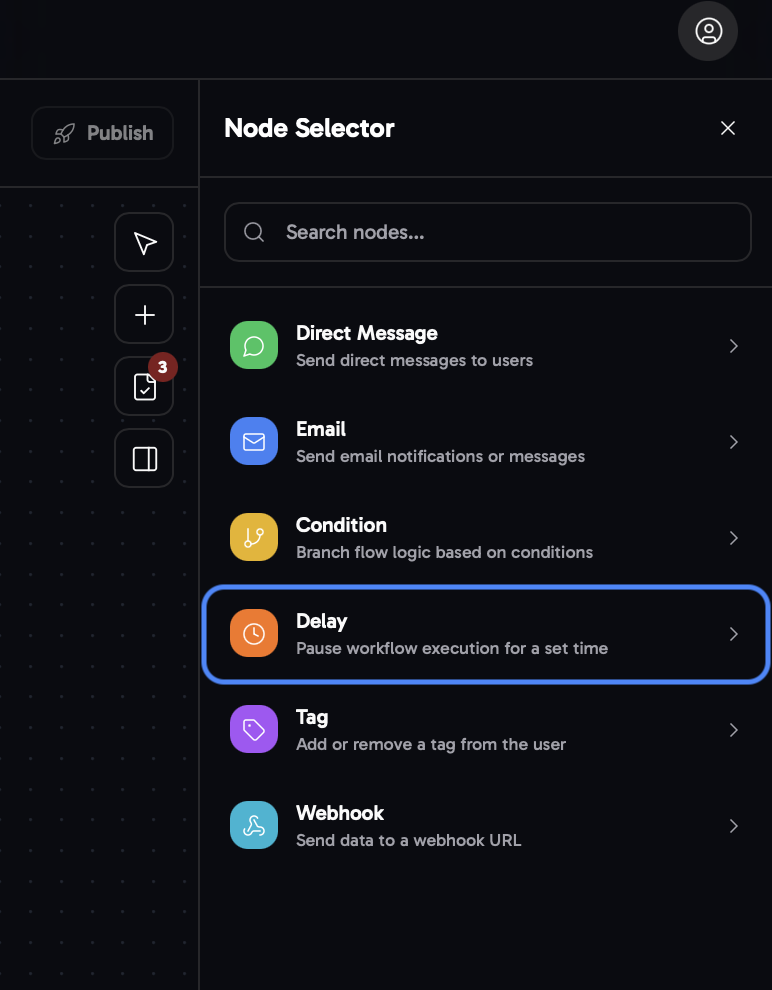
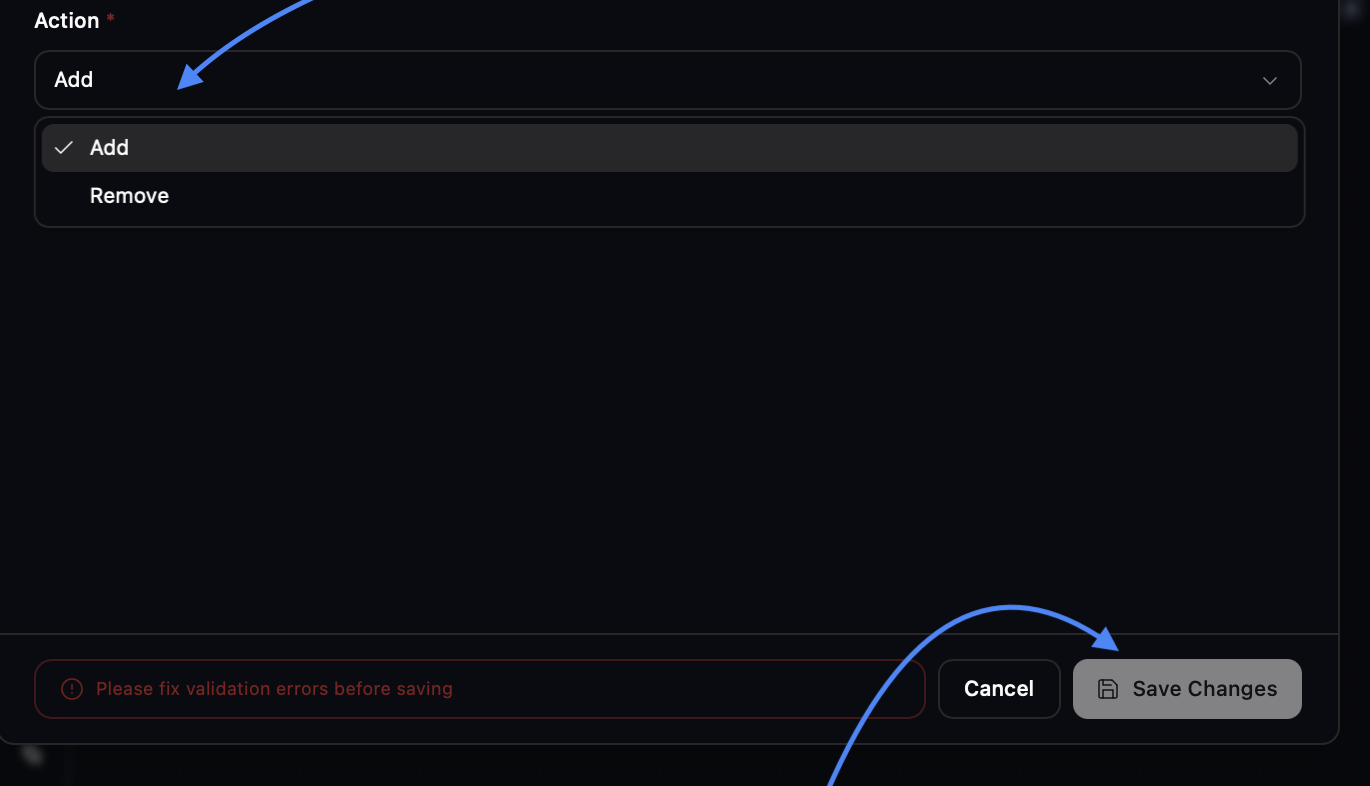
In this node, you can **automatically add or remove tags** in
the chat system at any point in the workflow based on member
behavior, time frames, lead status, and more.
Once you're happy with your setup, click **'Save Changes'** to
continue the flow.
After clicking **"Save changes"**, this pop-up should appear in
the bottom right corner. ✅
This node lets you **track message status, monitor folders and
tags, check replies, detect keywords under posts, and more**. It
helps you target specific groups more accurately and improve the
overall customer experience, driving more sales.
The "Advanced" section in the top right gives you additional
flexibility for building workflows, but it is more complex and
best suited for users with technical experience.
Adding both paths helps you track progress, organise leads,
personalize messages and automations based on behaviour, and
improve data tracking through webhooks.
Once you're happy with your setup, click **'Save Changes'** to
continue the flow.
After clicking **"Save changes"**, this pop-up should appear in
the bottom right corner. ✅
In this node, you can **automatically add or remove tags** in
the chat system at any point in the workflow based on member
behavior, time frames, lead status, and more.
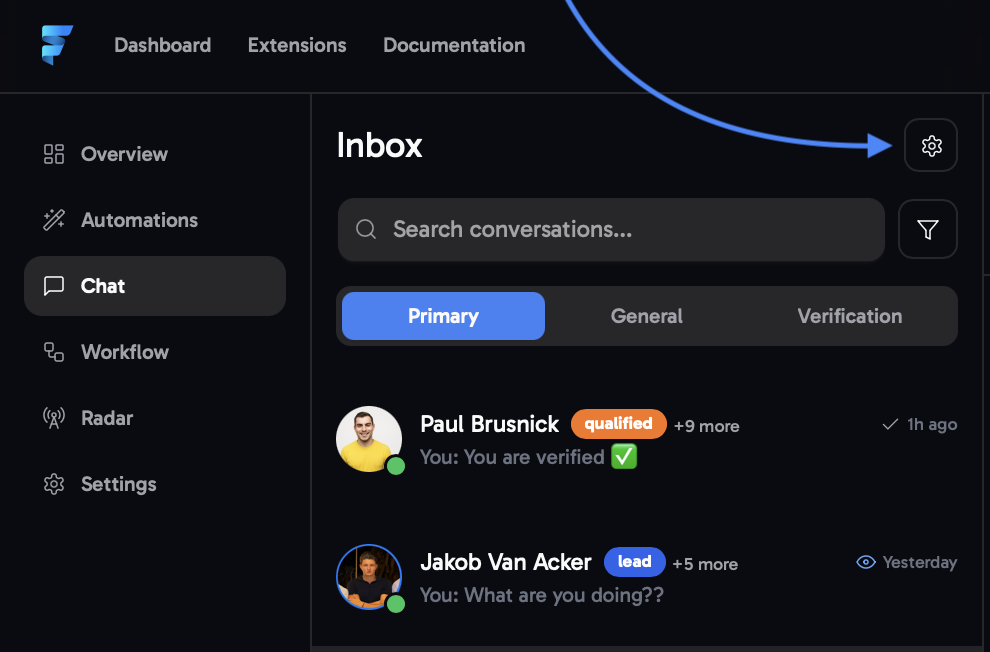
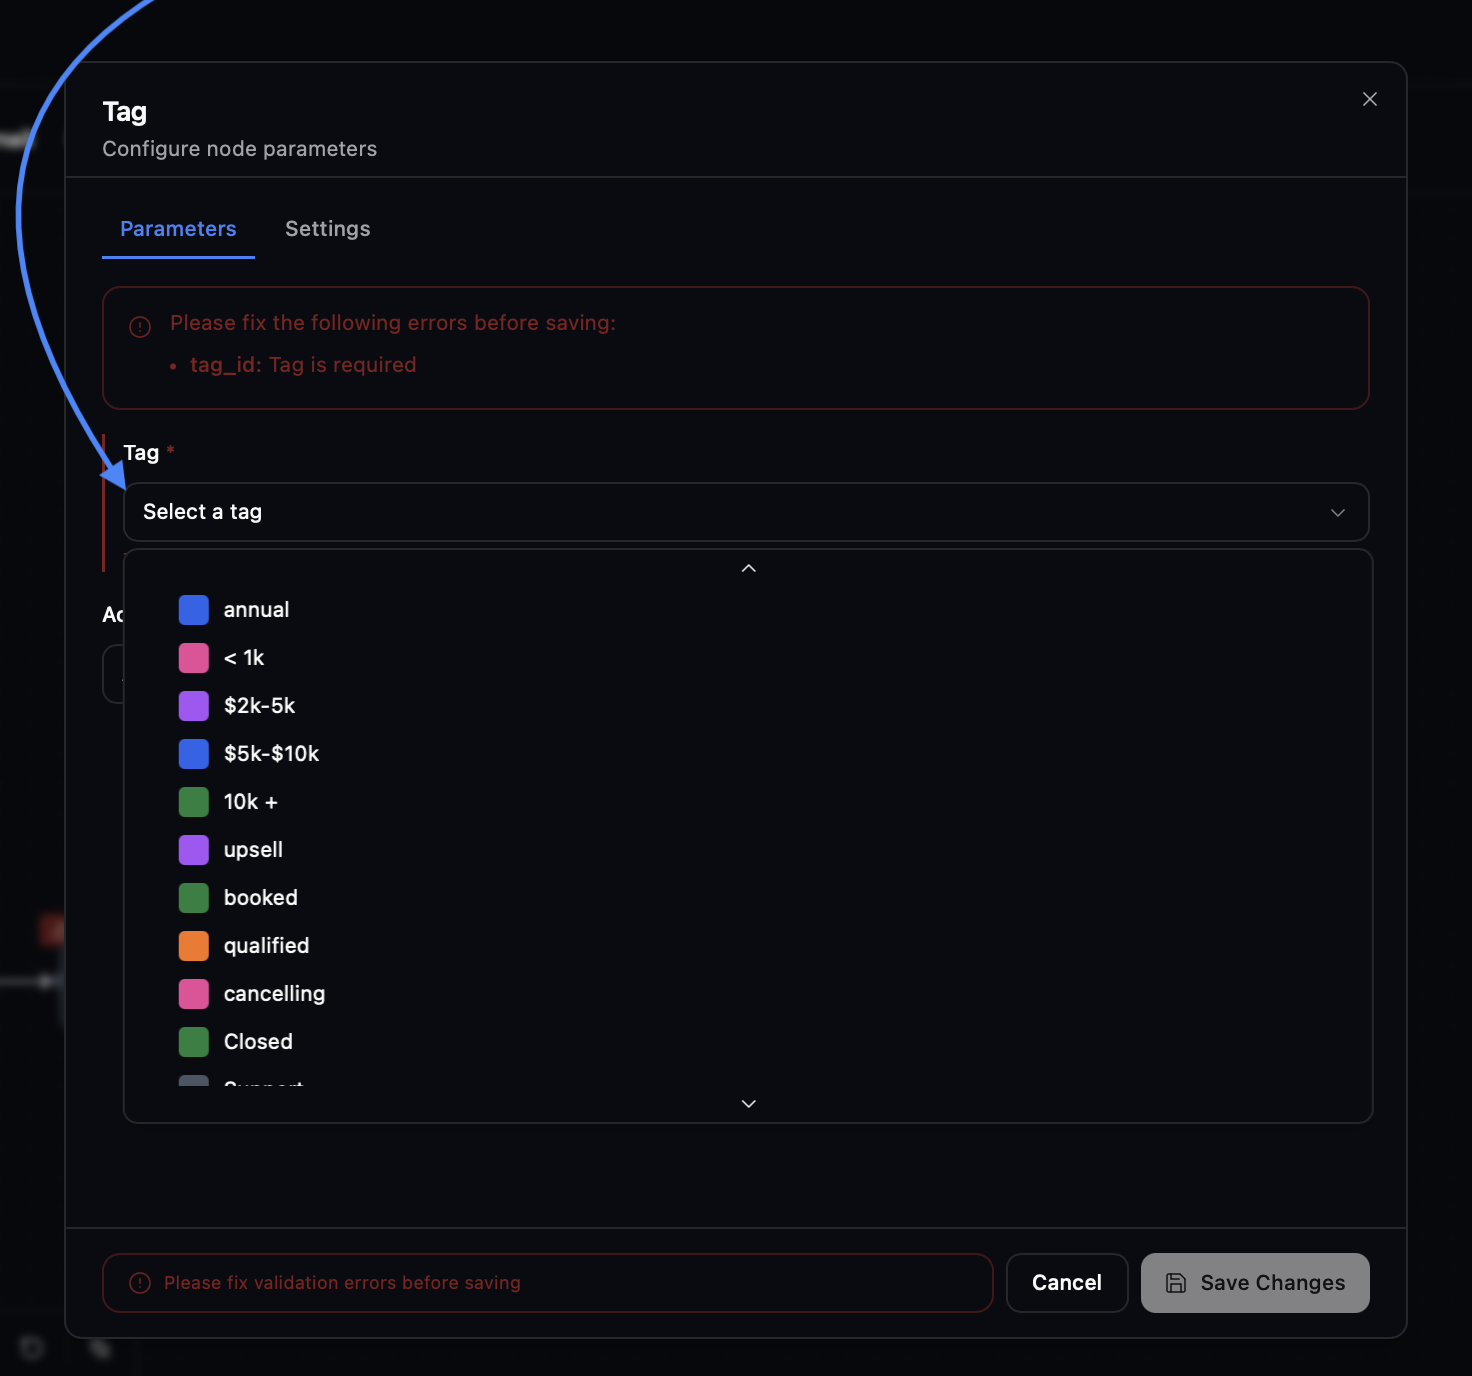 If the tag you want to apply or remove doesn't appear in this
dropdown, it hasn't been created yet. Simply go to the Chat
System and click the settings icon to create a new tag.
If the tag you want to apply or remove doesn't appear in this
dropdown, it hasn't been created yet. Simply go to the Chat
System and click the settings icon to create a new tag.
 Adding tags based on different phases or events and removing
them once they are no longer relevant can significantly improve
the structure and clarity of your entire workflow inside the
inbox.
Once you're happy with your setup, click **'Save Changes'** to
continue the flow.
After clicking **"Save changes"**, this pop-up should appear in
the bottom right corner. ✅
In this node, you can automatically send information based on member behaviour and phases of the workflow to other software, such as your CRM, Zapier, Google Sheets tracker, etc.
Click on the data you want to send over to other software.
To label the data, you can add a custom header in the field. This helps you track information more clearly, organize campaigns better, and target people more precisely.
Once you're happy with your Webhook setup, click **'Save Changes'** to continue the flow.
After clicking **"Save changes"**, this pop-up should appear in the bottom right corner. ✅
> These are **basic templates** to help you begin. You can personalize them at any time and add or remove nodes with the help of the **node guide above**.
## Basic Templates and Structure of Each Automation Type
Comment Trigger workflows help you capture leads by encouraging members to comment a specific keyword under a post to automatically receive information to their DMs. Add a clear and strong CTA at the end of your post to boost engagement.
**Here's how you set up a simple Comment Trigger workflow:**
1. Choose the Comment trigger when creating a new workflow.
2. After that, add the Condition node directly after the Comment trigger and insert the "contains keyword" value, then predefine the keyword you want to trigger.
3. Add a **Direct Message** right after the yes condition branch, so it sends instantly when someone comments the keyword.
You can also add a delay to give the automation a more natural, human touch.
4. Done. You've now created a basic keyword-triggered automation flow.
To make your workflow more effective and valuable, you can add follow-up chains, check whether members responded or viewed previous messages, and trigger follow-ups accordingly. You can also send webhooks based on specific actions to other software.
For detailed setup instructions, visit the Node Guide where every node and its configuration is explained.
Member Joined workflows help you automatically onboard new members, capture leads, boost engagement, and create upsell opportunities by checking in, following up, and pitching based on their join date and behavior inside the group and DMs.
Adding tags based on different phases or events and removing
them once they are no longer relevant can significantly improve
the structure and clarity of your entire workflow inside the
inbox.
Once you're happy with your setup, click **'Save Changes'** to
continue the flow.
After clicking **"Save changes"**, this pop-up should appear in
the bottom right corner. ✅
In this node, you can automatically send information based on member behaviour and phases of the workflow to other software, such as your CRM, Zapier, Google Sheets tracker, etc.
Click on the data you want to send over to other software.
To label the data, you can add a custom header in the field. This helps you track information more clearly, organize campaigns better, and target people more precisely.
Once you're happy with your Webhook setup, click **'Save Changes'** to continue the flow.
After clicking **"Save changes"**, this pop-up should appear in the bottom right corner. ✅
> These are **basic templates** to help you begin. You can personalize them at any time and add or remove nodes with the help of the **node guide above**.
## Basic Templates and Structure of Each Automation Type
Comment Trigger workflows help you capture leads by encouraging members to comment a specific keyword under a post to automatically receive information to their DMs. Add a clear and strong CTA at the end of your post to boost engagement.
**Here's how you set up a simple Comment Trigger workflow:**
1. Choose the Comment trigger when creating a new workflow.
2. After that, add the Condition node directly after the Comment trigger and insert the "contains keyword" value, then predefine the keyword you want to trigger.
3. Add a **Direct Message** right after the yes condition branch, so it sends instantly when someone comments the keyword.
You can also add a delay to give the automation a more natural, human touch.
4. Done. You've now created a basic keyword-triggered automation flow.
To make your workflow more effective and valuable, you can add follow-up chains, check whether members responded or viewed previous messages, and trigger follow-ups accordingly. You can also send webhooks based on specific actions to other software.
For detailed setup instructions, visit the Node Guide where every node and its configuration is explained.
Member Joined workflows help you automatically onboard new members, capture leads, boost engagement, and create upsell opportunities by checking in, following up, and pitching based on their join date and behavior inside the group and DMs.
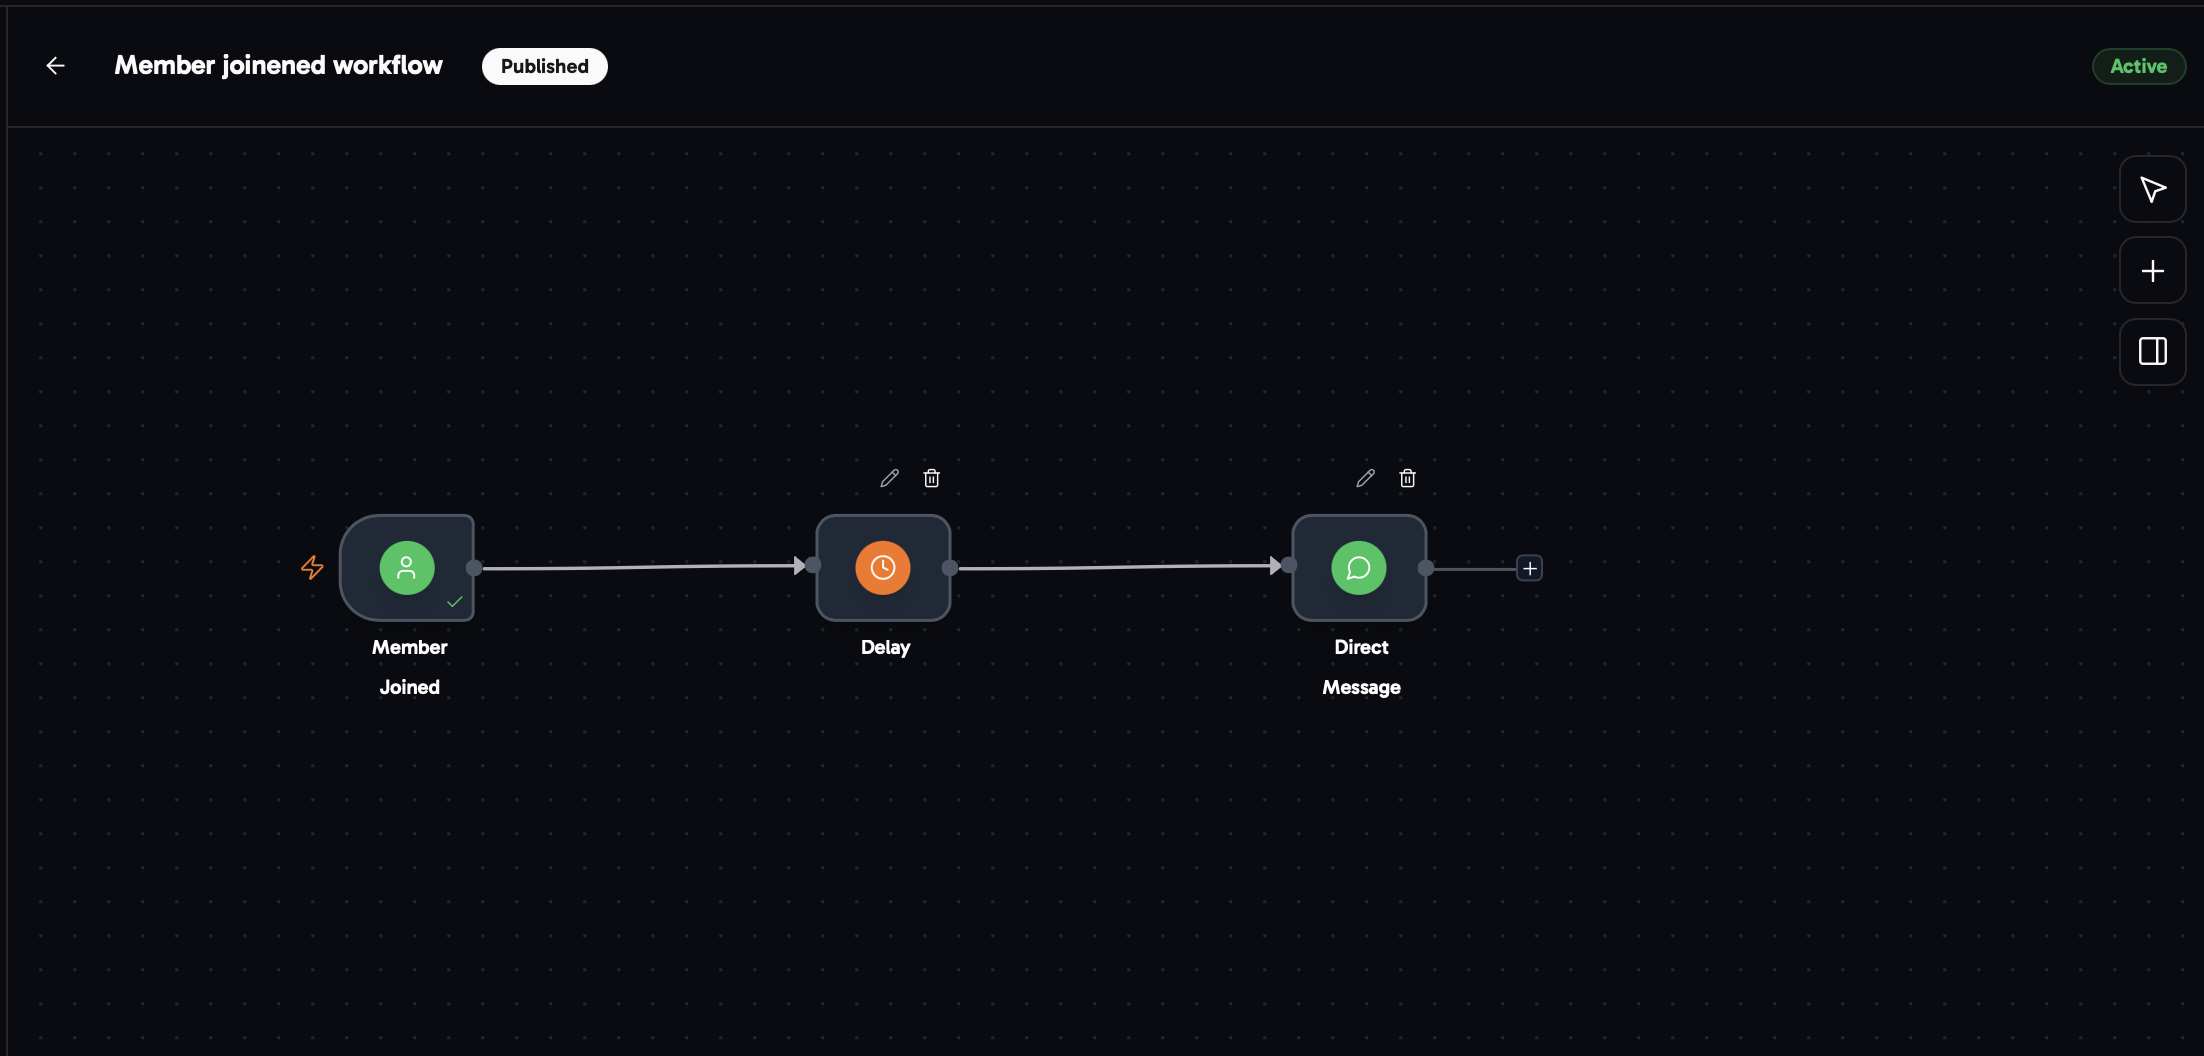 **Here's how you set up a simple Member Joined workflow:**
1. Choose the Member Joined trigger when creating a new workflow.
2. Next, place a Delay node right after the Member Joined trigger and set the amount of time the workflow should wait before continuing (skip this step if you want to act immediately).
3. After the delay, or instantly if you prefer, add a direct message that will be sent to all new members who join your community.
If you use the survey automation combined with the Member Joined trigger to reach out based on community membership answers, you must add a delay of at least 10 minutes so the system can register all data correctly.
4. Done. You've now created a basic Member Joined automation flow.
To make your workflow more effective and valuable, you can add follow-up chains, check whether members responded or viewed previous messages, and trigger follow-ups accordingly. You can also send webhooks based on specific actions to other software (CRM).
For detailed setup instructions, visit the Node Guide where every node and its configuration is explained.
Payment Failed workflows are designed to automatically check in with members, remind them about their payment issue, and guide them to update their payment method so they stay in the group. This is highly effective for reducing churn.
**Here's how you set up a simple Payment Failed workflow:**
1. Choose the **Payment Failed** trigger when creating a new workflow.
2. Next, place a Delay node right after the Payment Failed trigger and set the amount of time the workflow should wait before continuing (skip this step if you want to act immediately).
3. Following the delay, or instantly if preferred, set up a direct message and/or email to reach members as soon as a card is declined and payment doesn't go through.
4. Done. You've now created a basic Payment Failed automation flow.
To make your workflow more effective and valuable, you can add follow-up chains, check whether members responded or viewed previous messages, and trigger follow-ups accordingly. You can also send webhooks based on specific actions to other software (CRM).
For detailed setup instructions, visit the Node Guide where every node and its configuration is explained.
You can also add Tag nodes anywhere in the workflow to automatically assign or remove tags, giving you more context when messaging members. For example, attach a 'Payment Failed' tag as soon as the workflow is triggered.
Cancellation workflows proactively reach out when a member cancels, giving you a final opportunity to retain them. You can offer tailored incentives, remind them of the value they're missing, and gather feedback to improve your offer — all while increasing your chances of winning them back and lowering churn long term.
**Here's how you set up a simple Member Joined workflow:**
1. Choose the Member Joined trigger when creating a new workflow.
2. Next, place a Delay node right after the Member Joined trigger and set the amount of time the workflow should wait before continuing (skip this step if you want to act immediately).
3. After the delay, or instantly if you prefer, add a direct message that will be sent to all new members who join your community.
If you use the survey automation combined with the Member Joined trigger to reach out based on community membership answers, you must add a delay of at least 10 minutes so the system can register all data correctly.
4. Done. You've now created a basic Member Joined automation flow.
To make your workflow more effective and valuable, you can add follow-up chains, check whether members responded or viewed previous messages, and trigger follow-ups accordingly. You can also send webhooks based on specific actions to other software (CRM).
For detailed setup instructions, visit the Node Guide where every node and its configuration is explained.
Payment Failed workflows are designed to automatically check in with members, remind them about their payment issue, and guide them to update their payment method so they stay in the group. This is highly effective for reducing churn.
**Here's how you set up a simple Payment Failed workflow:**
1. Choose the **Payment Failed** trigger when creating a new workflow.
2. Next, place a Delay node right after the Payment Failed trigger and set the amount of time the workflow should wait before continuing (skip this step if you want to act immediately).
3. Following the delay, or instantly if preferred, set up a direct message and/or email to reach members as soon as a card is declined and payment doesn't go through.
4. Done. You've now created a basic Payment Failed automation flow.
To make your workflow more effective and valuable, you can add follow-up chains, check whether members responded or viewed previous messages, and trigger follow-ups accordingly. You can also send webhooks based on specific actions to other software (CRM).
For detailed setup instructions, visit the Node Guide where every node and its configuration is explained.
You can also add Tag nodes anywhere in the workflow to automatically assign or remove tags, giving you more context when messaging members. For example, attach a 'Payment Failed' tag as soon as the workflow is triggered.
Cancellation workflows proactively reach out when a member cancels, giving you a final opportunity to retain them. You can offer tailored incentives, remind them of the value they're missing, and gather feedback to improve your offer — all while increasing your chances of winning them back and lowering churn long term.
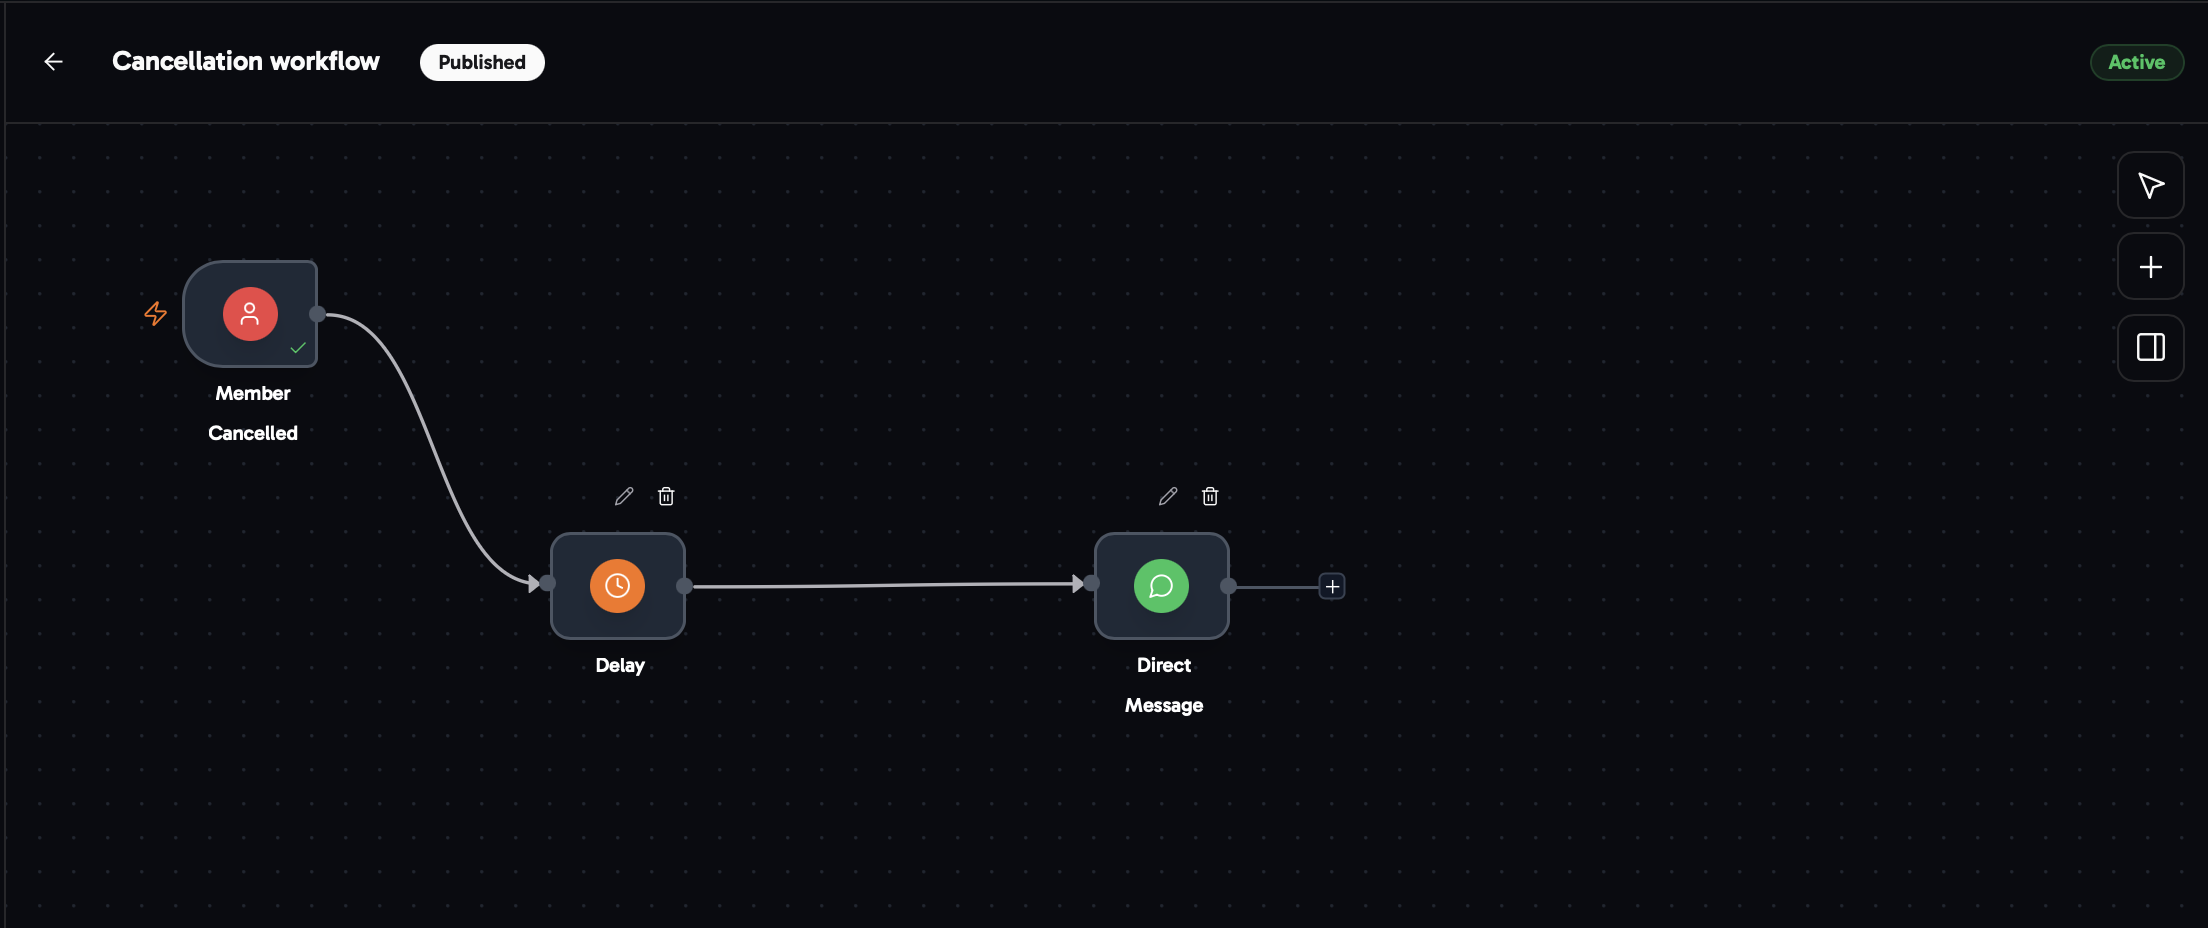 **Here's how you set up a simple Cancellation workflow:**
1. Choose the Cancellation trigger when creating a new workflow.
2. Next, place a Delay node right after the Member Cancellation trigger and set the amount of time the workflow should wait before continuing (skip this step if you want to act immediately).
3. Following the delay, or instantly if preferred, set up a direct message and/or email to reach members as soon as they cancel their subscription.
4. Done. You've now created a basic Cancellation automation flow.
To make your workflow more effective and valuable, you can add follow-up chains, check whether members responded or viewed previous messages, and trigger follow-ups accordingly. You can also send webhooks based on specific actions to other software (CRM).
For detailed setup instructions, visit the Node Guide where every node and its configuration is explained.
You can also add Tag nodes anywhere in the workflow to automatically assign or remove tags, giving you more context when messaging members. For example, attach a 'Cancellation' tag as soon as the workflow is triggered.
## Navigation Tips and Tricks
> **Master Workflow Navigation to Build Automations Faster, Smarter, and More Efficiently**
### Efficient Navigation
In the top left, you can exit the workflow builder at any time and your progress will be saved automatically. In the top right, you can publish and activate workflows with one click once they're ready.
**Here's how you set up a simple Cancellation workflow:**
1. Choose the Cancellation trigger when creating a new workflow.
2. Next, place a Delay node right after the Member Cancellation trigger and set the amount of time the workflow should wait before continuing (skip this step if you want to act immediately).
3. Following the delay, or instantly if preferred, set up a direct message and/or email to reach members as soon as they cancel their subscription.
4. Done. You've now created a basic Cancellation automation flow.
To make your workflow more effective and valuable, you can add follow-up chains, check whether members responded or viewed previous messages, and trigger follow-ups accordingly. You can also send webhooks based on specific actions to other software (CRM).
For detailed setup instructions, visit the Node Guide where every node and its configuration is explained.
You can also add Tag nodes anywhere in the workflow to automatically assign or remove tags, giving you more context when messaging members. For example, attach a 'Cancellation' tag as soon as the workflow is triggered.
## Navigation Tips and Tricks
> **Master Workflow Navigation to Build Automations Faster, Smarter, and More Efficiently**
### Efficient Navigation
In the top left, you can exit the workflow builder at any time and your progress will be saved automatically. In the top right, you can publish and activate workflows with one click once they're ready.
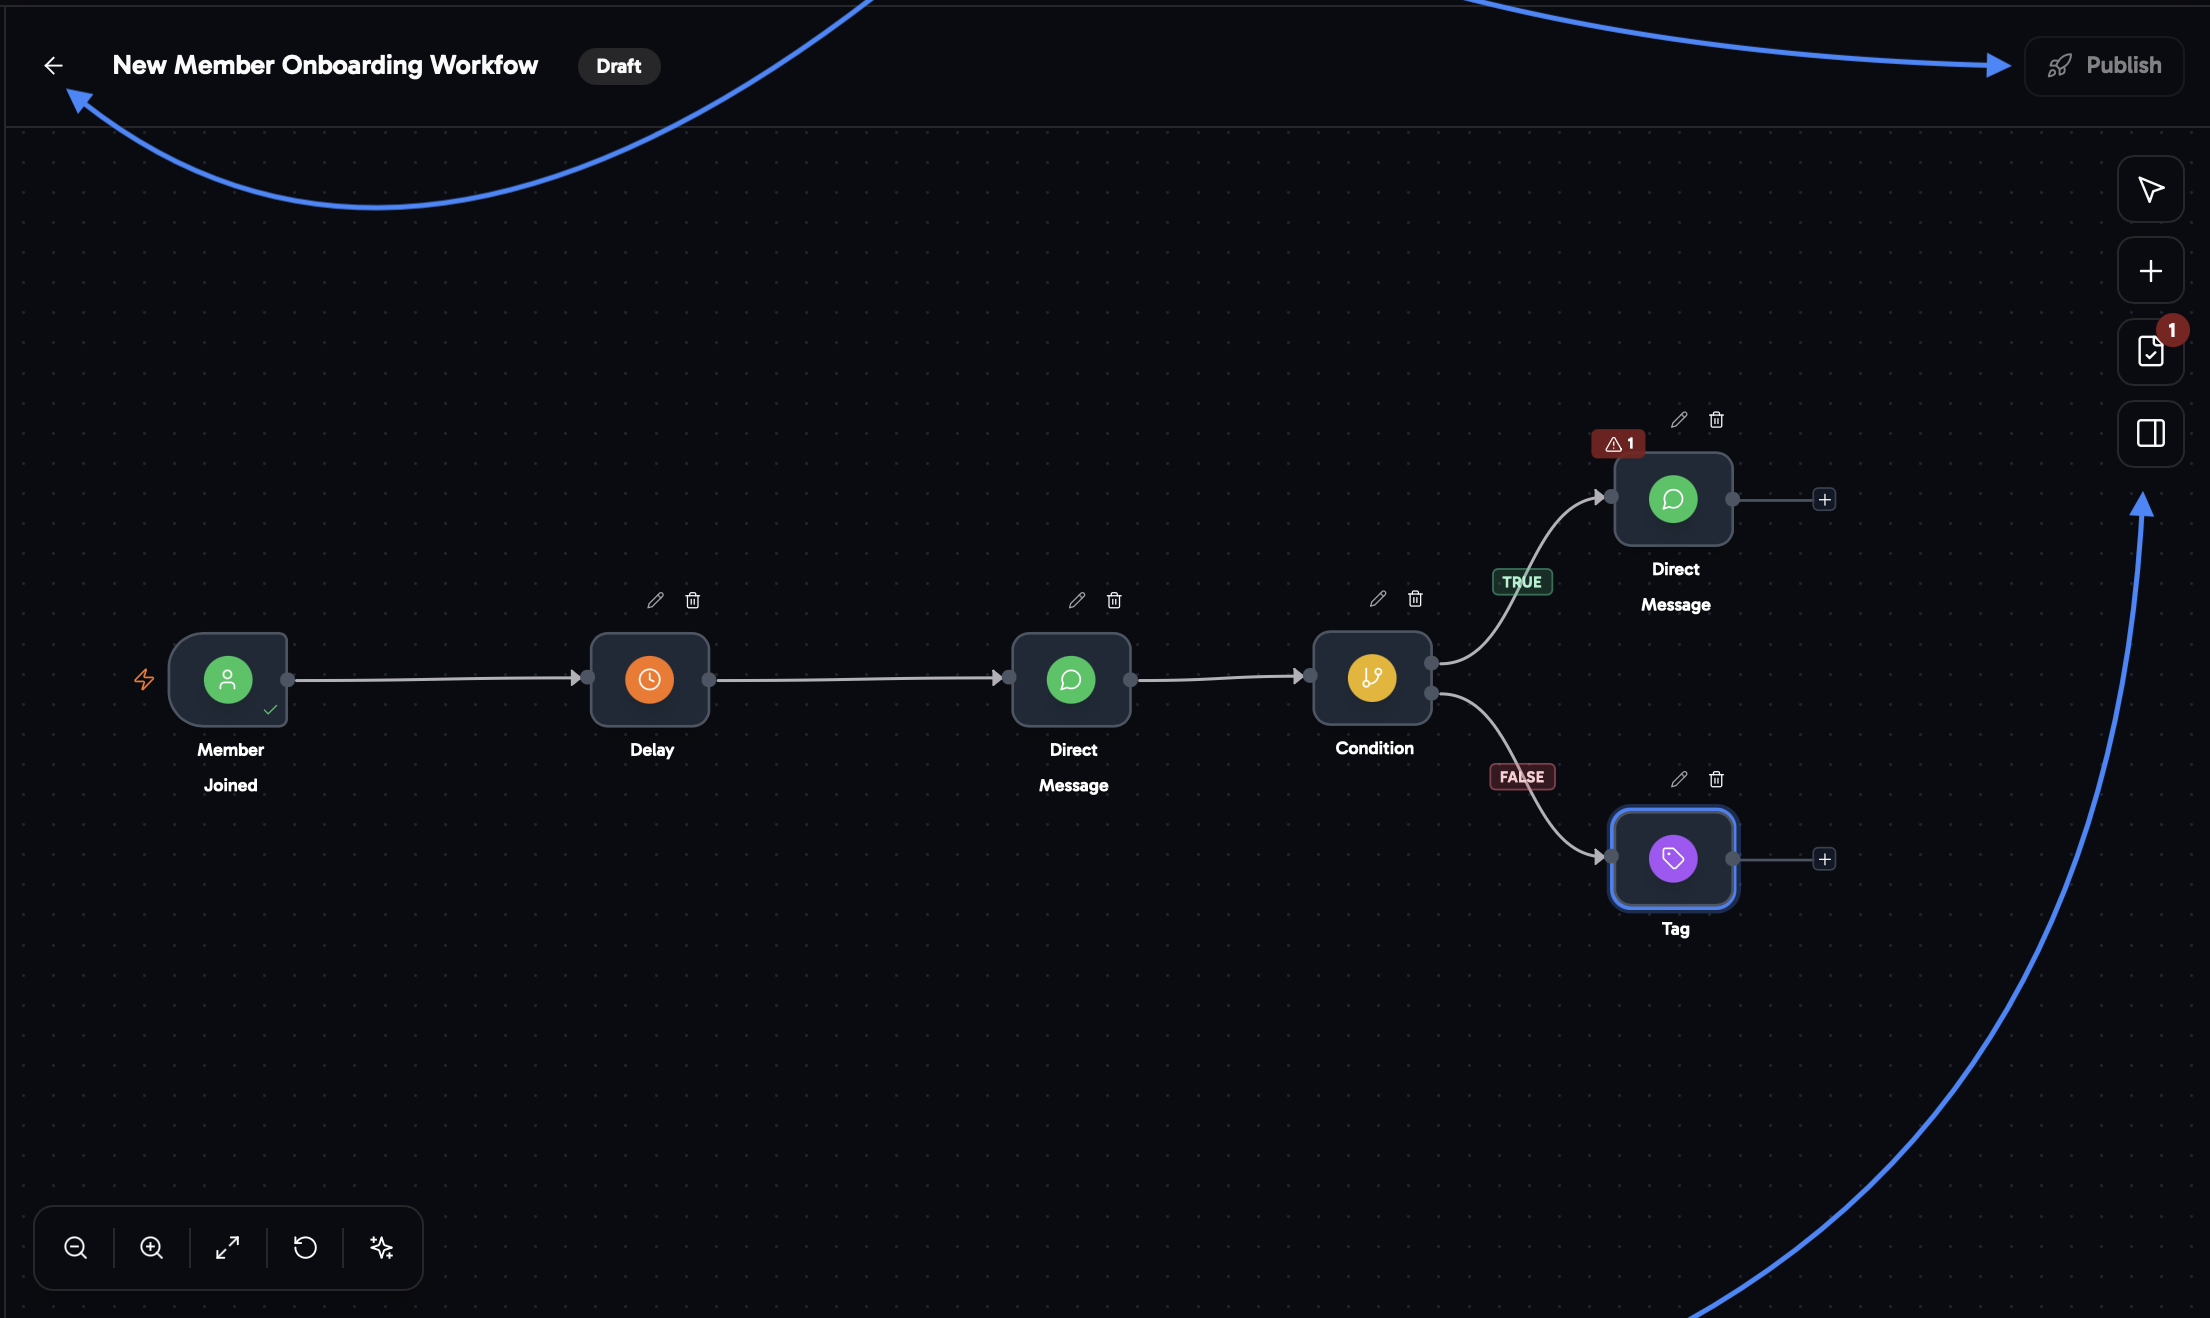 **The bar on the right side has four different fields and functions:**
1. **Mouse Icon:** This is the multi-select tool. It allows you to select multiple nodes at once by dragging your mouse across them. You can then move, copy, or delete the selected nodes together.
2. **Plus Icon:** This button lets you add new nodes to your workflow. Follow this detailed guide to understand how each node works and how to set it up correctly.
3. **Overview Panel:** This section shows all current issues or errors within the workflow, including explanations and guidance on how to fix them.
4. **Toggle Icon:** This icon allows you to hide or show the right side panel based on your preference and the complexity of your workflow.
### Tips and Tricks
This section helps you learn faster, more efficient systems and useful shortcuts that can save you a significant amount of time.
Copy and paste nodes including their content and move them freely within the workflow:
```text theme={null}
Copy: Shift + mouse drag → Command C
```
To paste the copied nodes into the workflow again:
```text theme={null}
Command V + move mouse to the desired location
```
Select the node you want to remove and press the **Delete** key on your keyboard.
> **Tips:**
>
> There are many advanced tips for building complex and highly efficient workflows. You can explore our community for a complete playbook on what works and has been tested already by top communities.
## Manage & Control Your Workflows in the Workflow Dashboard
The **workflow dashboard** gives you a clear overview of all active, inactive, and draft workflows. You can **track the status and executions** of each workflow to stay informed and maintain full control.
**The bar on the right side has four different fields and functions:**
1. **Mouse Icon:** This is the multi-select tool. It allows you to select multiple nodes at once by dragging your mouse across them. You can then move, copy, or delete the selected nodes together.
2. **Plus Icon:** This button lets you add new nodes to your workflow. Follow this detailed guide to understand how each node works and how to set it up correctly.
3. **Overview Panel:** This section shows all current issues or errors within the workflow, including explanations and guidance on how to fix them.
4. **Toggle Icon:** This icon allows you to hide or show the right side panel based on your preference and the complexity of your workflow.
### Tips and Tricks
This section helps you learn faster, more efficient systems and useful shortcuts that can save you a significant amount of time.
Copy and paste nodes including their content and move them freely within the workflow:
```text theme={null}
Copy: Shift + mouse drag → Command C
```
To paste the copied nodes into the workflow again:
```text theme={null}
Command V + move mouse to the desired location
```
Select the node you want to remove and press the **Delete** key on your keyboard.
> **Tips:**
>
> There are many advanced tips for building complex and highly efficient workflows. You can explore our community for a complete playbook on what works and has been tested already by top communities.
## Manage & Control Your Workflows in the Workflow Dashboard
The **workflow dashboard** gives you a clear overview of all active, inactive, and draft workflows. You can **track the status and executions** of each workflow to stay informed and maintain full control.
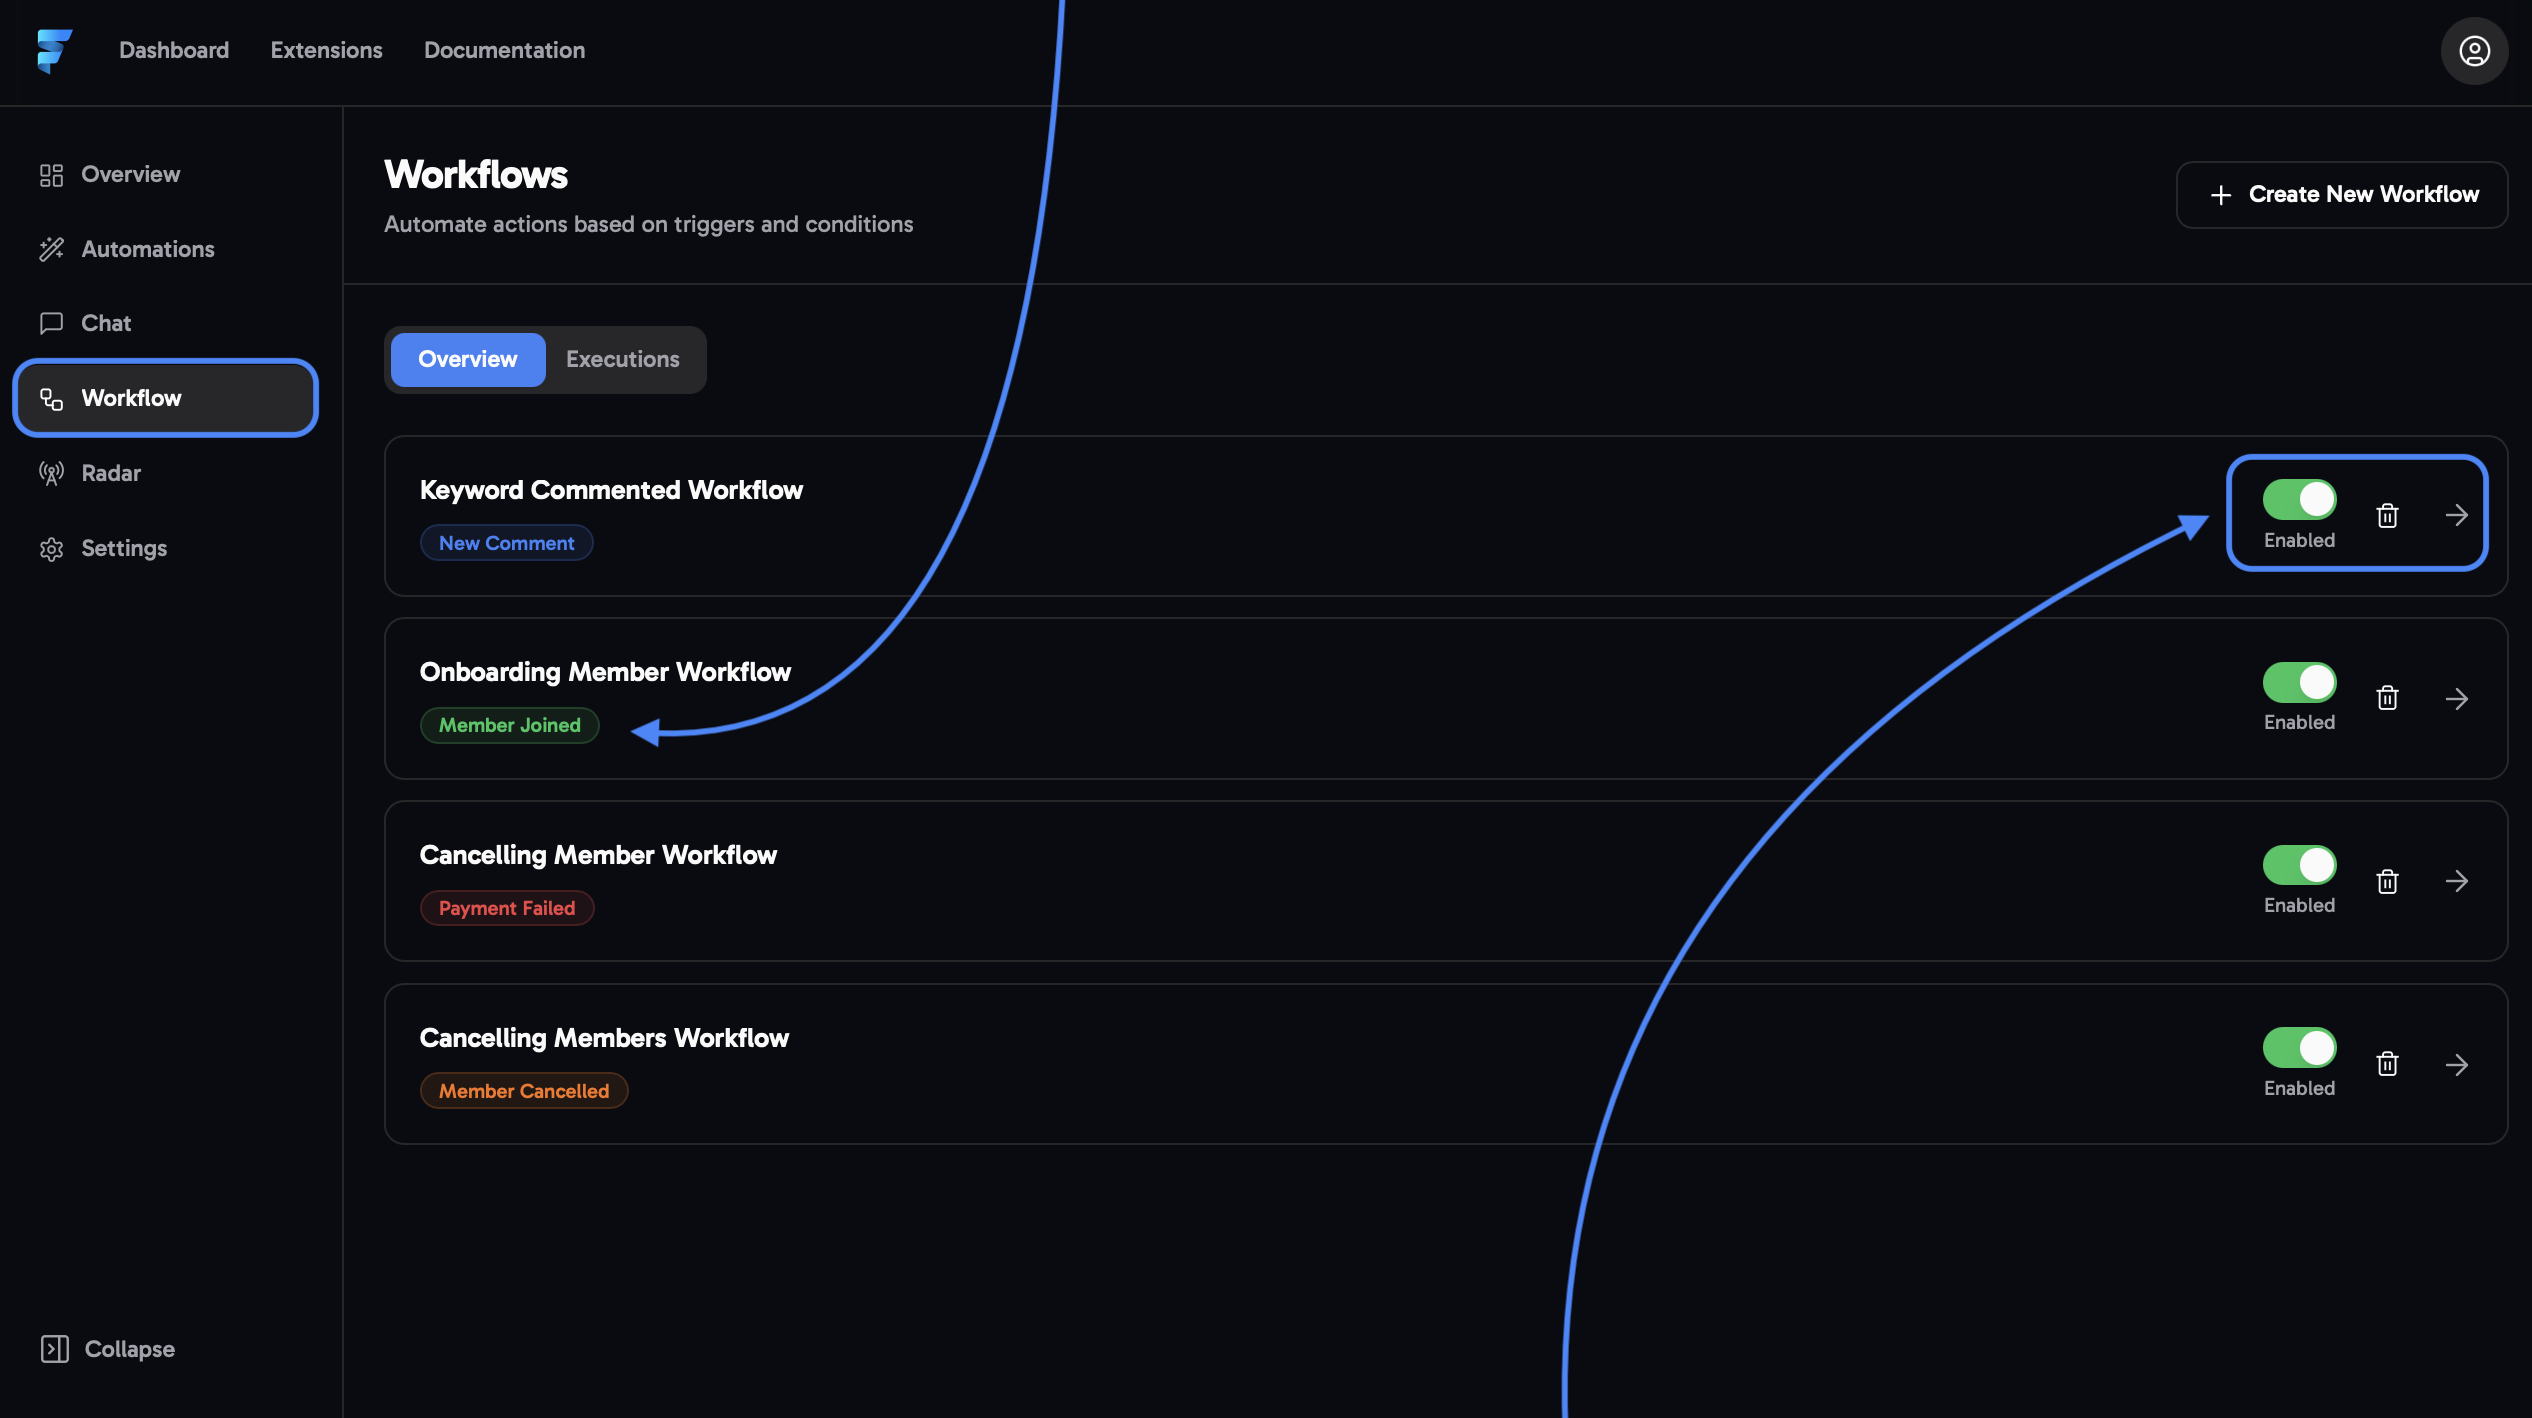 The workflow dashboard is divided into an **Overview page** and an **Executions page**.
**Overview Page**
On the left side, you can review the workflow name, description, and trigger type, such as Member Joined, Commented, etc.
Quickly enable or disable workflows, delete them, or edit and change the flow by clicking on it.
### Executions Page
On this page, you can check the stage a workflow is in and whether it's currently running.
> **Filter by workflow status or individual workflows to review performance and track behavior.**
The workflow dashboard is divided into an **Overview page** and an **Executions page**.
**Overview Page**
On the left side, you can review the workflow name, description, and trigger type, such as Member Joined, Commented, etc.
Quickly enable or disable workflows, delete them, or edit and change the flow by clicking on it.
### Executions Page
On this page, you can check the stage a workflow is in and whether it's currently running.
> **Filter by workflow status or individual workflows to review performance and track behavior.**
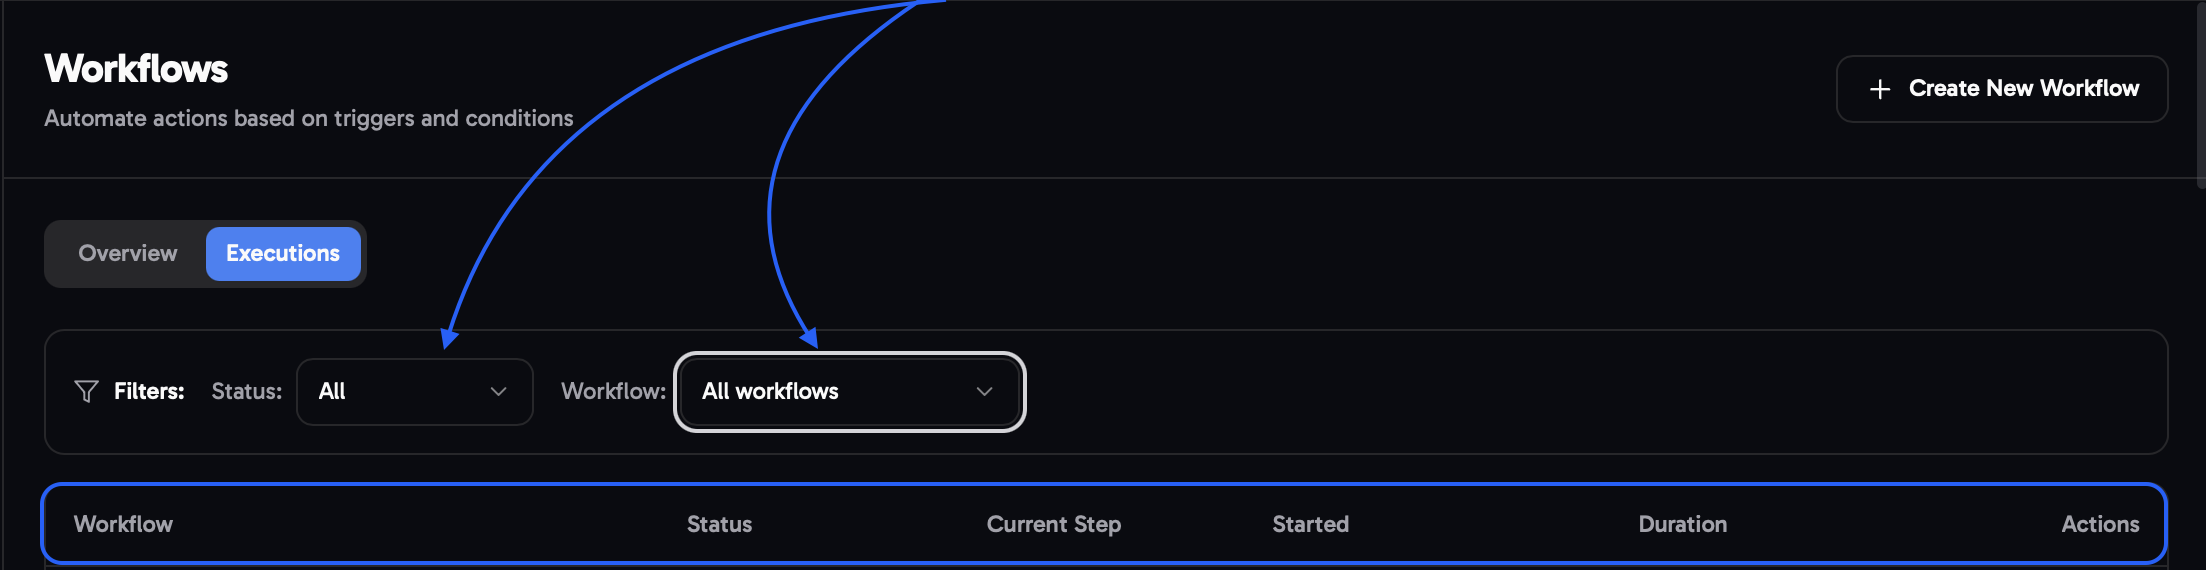 Review workflows based on status, active step, start time, duration, and
individual actions.
Review workflows based on status, active step, start time, duration, and
individual actions.